This article will learn to work with graphical LCDs on the example of the Nokia 5110 screen. This is a rather popular display, which stands out for its low cost and ability to display in a convenient form not only text but also graphical data (graphics, images, etc.). The resolution of the Nokia 5110 screen is 48×84px. We will learn how to connect the Nokia display to the Arduino and give an example of a sketch to work with it.
Connecting the 5110 Display to the Arduino
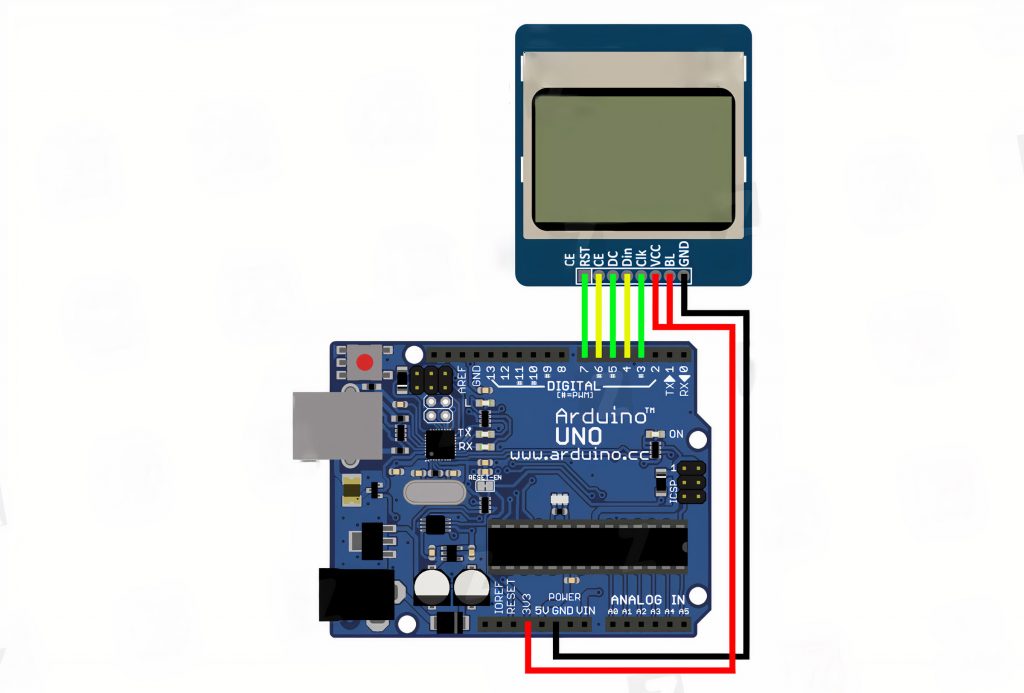
To begin with, let’s look at connecting this display to the Arduino and look at the data interface. The display board has 8 pins:
- RST – Reset;
- CE – Chip Select (device selection);
- DC – Data/Command select (mode selection);
- DIn – Data In (data);
- Clk – Clock (clocking signal);
- Vcc – 3.3V power supply;
- BL – Backlight 3.3V;
- GND – grounding.
As you have already noticed, the display (Vcc) should be powered with a voltage no higher than 3.3V; the same voltage is maximum for backlighting the display (BL). However, the logic outputs are tolerant of the 5V logic used by Arduino. However, it is still recommended to connect the logic pins through 10 kOhm resistors so that you can extend the life of the display.
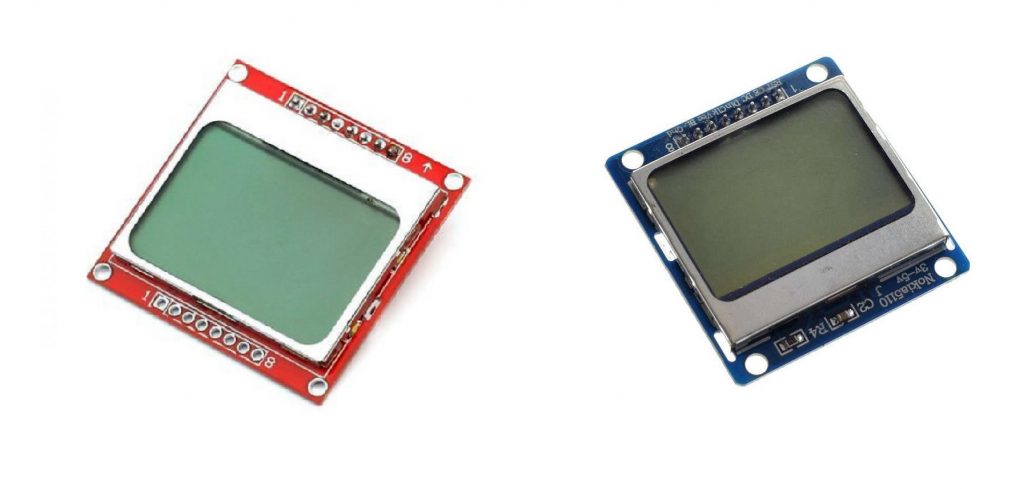
It should also be noted that there are versions of displays (usually with a red board) with LIGHT output instead of BL. In this case, you can turn on the backlight by connecting this output to the power minus (GND).
Pin RST (active LOW) is responsible for rebooting the display, and with the help of pin CE (active LOW), the display controller is informed that the data exchange occurs with it. DC input is responsible for the input mode – data input or command input (LOW – data, HIGH – commands). Clk input allows the display controller to determine the data rate, and through pin DIn, the data is directly transferred to the display controller.
Sketch and Library for Work with the Display
To work with this display there are many libraries, but we will use a very simple and functional library
| Function | Destination |
| LCD5110(SCK, MOSI, DC, RST, CS) | Application display with connection pin. |
| InitLCD([contrast]) | Initialize display with optional contrast indication (0-127), default value is 70. |
| setContrast(contrast) | Contrast change (0-127). |
| enableSleep() | Transforms the screen to sleep. |
| disableSleep() | Exits screen from sleep mode. |
| clrScr() | Clears screen. |
| clrRow(row, [start], [end]) | Clears the selected line (row number), from start to end position (optional). |
| invert(true), invert(false) | Enables and disables content LCD. |
| print(string, x, y) | Produces a character string with specified coordinates (x, y); LEFT, CENTER and RIGHT can be used instead of x-coordinates; standard font height is 8 points, so strings must go at intervals of 8. |
| printNumI(num, x, y, [length], [filler]) | Puts an integer (num) on the screen at a given position (x, y); optional: length is the number of characters reserved for a number; filler is the character to fill in “emptiness” if the number is less than the desired length length (by default it is a space ” “). |
| printNumF(num, dec, x, y, [divider], [length], [filler]) | Produces a floating point number (num); dec is the number of decimal places; optional: divider is the decimal separator character, default is “.”, length and filler is similar to the previous function. |
| setFont(name) | Selects font; built-in fonts are SmallFont, MediumNumbers and BigNumbers. |
| invertText(true), invertText(false) | Inverts text output from print, printNumI and printNumF functions (on/off). |
| drawBitmap(x, y, data, sx, sy) | Puts the image on the screen by the necessary coordinates (x, y); data is an array containing the image; sx and sy are the width and height of the image. |
Let’s consider the work with the display using this library on the example of a simple sketch:
#include <LCD5110_Basic.h>

LCD5110 LCD(7, 6, 5, 4, 3); //include the display with the pins of connection

extern uint8_t SmallFont[]; // specify the presence of an array with font SmallFont in the library

extern uint8_t MediumNumbers []; // specify the presence of an array with font MediumNumbers in the library

void setup() {

     LCD.InitLCD(); //initialize display

}

void loop() {

LCD.disableSleep(); //display out of sleep mode

LCD.clrScr(); //cleaning display

LCD.setFont(SmallFont); // install font SmallFont

LCD.print("Hello World!", CENTER, 2); //return "Hello World!" on the second line with center equalization

LCD.setFont(MediumNumbers); // set font MediumNumbers

for (int i=0; i<=5; i++) {

     LCD.clrScr(); //cleaning the screen

     LCD.print(i, CENTER, 20); // Output the value of i in the center of 20 lines

     delay(1000);

}

LCD.enableSleep(); // put the display in sleep mode for a long pause

delay(5000);

}
After we have considered the library’s basic functions, let’s take a closer look at the drawBitmap function and consider the features of displaying images on the screen.
To start with, we will need the image of interest in .bmp format.
Then you need to download the program for generating images. In the program window, set the necessary resolution of our image on display (should be less than 84 pixels horizontally and 48 vertically).
Then we get an array and copy the appeared array to a new sketch.
#include <LCD5110_Basic.h>

LCD5110 LCD(7, 6, 5, 4, 3); //announce the display indicating the connection pins

static const char lcd_image_mas[288] = {} // image array

void setup() {

     LCD.InitLCD(); //initialize display

}

void loop() {

LCD.clrScr(); //cleaning display

LCD.drawBitmap(18, 0, lcd_image_mas, 48, 48); //retrieve the image from an array of 48x48 pixels starting from the point 18x0

LCD.enableSleep(); // Enter display into sleep mode

while(1);

}
Comparison of Nokia 5110 LCD Connection Methods with Arduino
The Nokia 5110 LCD module is a popular choice for displaying information with Arduino projects due to its low power consumption and simplicity. There are various methods to connect the Nokia 5110 LCD with an Arduino board, each with its advantages and limitations. This table compares different indicators for three common connection methods: using the GPIO pins, using the SPI interface, and using an I2C interface.
| Connection Method | Complexity | Wiring | Speed | Memory Usage |
|---|---|---|---|---|
| GPIO Pins | Low | More wires required | Slower | Higher |
| SPI Interface | Medium | Less complex wiring | Faster | Lower |
| I2C Interface | High | Simple wiring | Fastest | Lowest |
The table above compares three methods for connecting the Nokia 5110 LCD with an Arduino board. Here’s an explanation of each indicator:
- Complexity: Refers to the level of difficulty in implementing the connection method. Using GPIO pins is the simplest method, followed by the SPI interface, and the I2C interface requires the highest complexity.
- Wiring: Indicates the number and complexity of wires needed for each connection method. The GPIO pins method requires more wires, while the SPI interface uses less complex wiring, and the I2C interface needs the simplest wiring.
- Speed: Refers to the data transfer speed between the Arduino and the LCD module. The GPIO pins method is the slowest, the SPI interface is faster, and the I2C interface provides the fastest data transfer.
- Memory Usage: Indicates the amount of Arduino board memory required for each connection method. Using GPIO pins consumes the most memory, while the SPI interface consumes less, and the I2C interface utilizes the lowest memory.
The I2C interface offers the most efficient and convenient way to connect the Nokia 5110 LCD with an Arduino, as it provides the fastest data transfer with minimal memory usage and straightforward wiring. However, for simpler projects or when memory usage is not a significant concern, using the SPI interface can be a good balance between speed and complexity. The GPIO pins method should be chosen when simplicity is crucial, but it may come with limitations in terms of speed and memory consumption.
Conclusions
In this way, we reviewed in detail the basic capabilities of the Nokia 5110 display using the LCD5110_Basic library, learned how to quickly and easily display your own images on the screen, and understood the nuances associated with connecting the display to the Arduino platform.