
Arduino ultrasonic distance sensors are very much in demand in robotics projects because of their relative simplicity, sufficient accuracy, and availability. They can be used as devices to help you avoid obstacles, get the dimensions of objects, simulate a room map, and signal objects’ approach or distance. One common option for such a device is the distance sensor, which includes the HC-SR04 ultrasonic rangefinder. In this article, we will get acquainted with the principle of operation of the distance sensor, consider several options of connection to the Arduino boards, the scheme of interaction, and examples of sketches.
The Distance Sensor in Arduino Projects
The ability of the ultrasonic sensor to determine the distance to an object is based on the sonar principle – by sending a beam of ultrasound and receiving its reflection with a delay, the device determines the presence of objects and the distance to them. Ultrasonic signals generated by the receiver, reflected from the obstacle, return to it after a certain period of time. It is this time interval that becomes the characteristic that helps determine the distance to the object.
Note: Since the operation principle is based on ultrasound, this sensor is not suitable for determining the distance to sound-absorbing objects. Optimal for measurement are objects with a smooth surface.
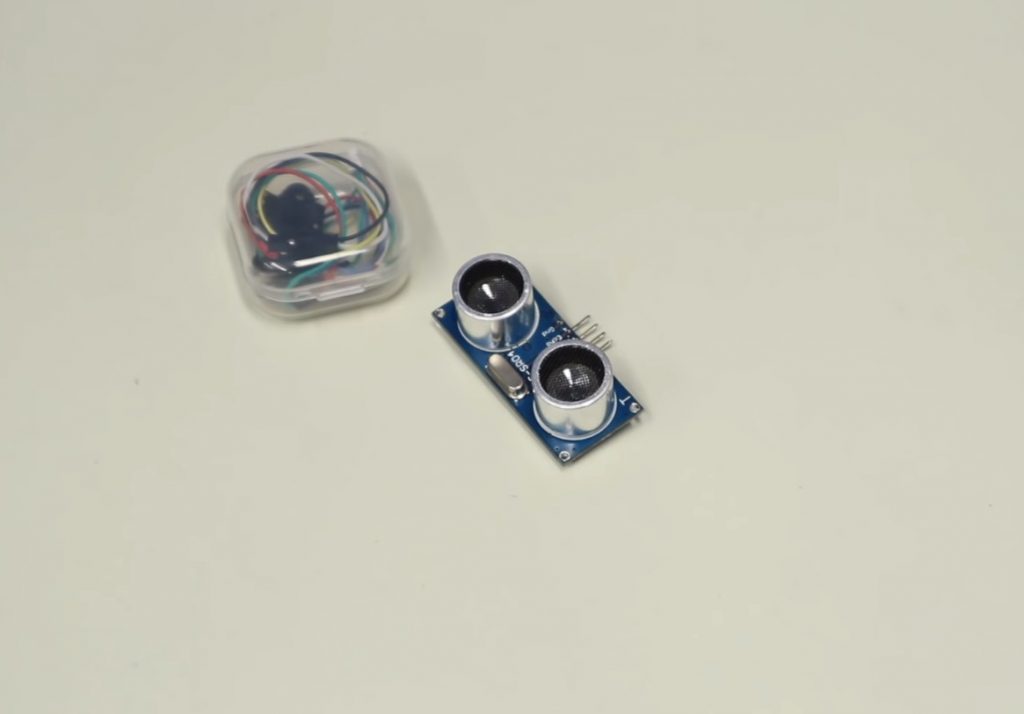
HC-SR04 Sensor Description
The Arduino distance sensor is a non-contact type device and provides highly accurate measurement and stability. It has a range of 0.78 to 157 inches. Its operation is not significantly affected by electromagnetic radiation and solar energy. The HC-SR04 Arduino module kit also includes a receiver and a transmitter.
The HC SR04 ultrasonic rangefinder has the following technical parameters:
- The supply voltage is 5V;
- The operating parameter of the current strength is 15 mA;
- The current strength in the passive state is up to 2 mA;
- Viewing angle – 15°;
- Sensing resolution – 0.3 cm;
- Measuring angle – 30°;
- Pulse width – 10-6 s.
The sensor is equipped with four pins (standard 2, 54 mm):
- The positive type of power contact – +5V;
- Trig (T) – input signal output;
- Echo (R) – output signal output;
- GND – ground output.
Scheme of Interaction with Arduino
To receive data, you need to perform the following sequence of actions:
- To send a pulse of 10 microseconds to the Trig output;
- The ultrasonic rangefinder HC-SR04 connected to the Arduino will convert the signal into 8 pulses with a frequency of 40 kHz that will be sent forward through the transmitter;
- When the pulses reach the obstacle, they will bounce off it and will be received by the receiver R, which will provide an input signal at the Echo output;
- On the controller side, the received signal should be translated into distance using formulas.
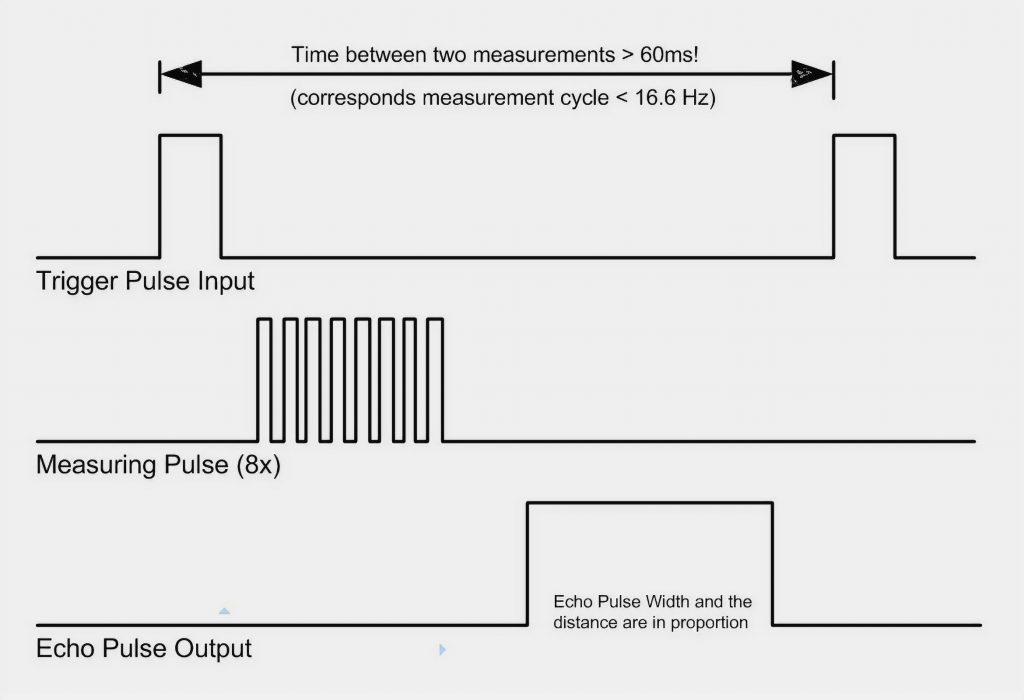
Dividing the pulse width by 58.2 will give data in centimeters. Dividing by 148 will give data in inches.
Connecting the HC SR04 to the Arduino
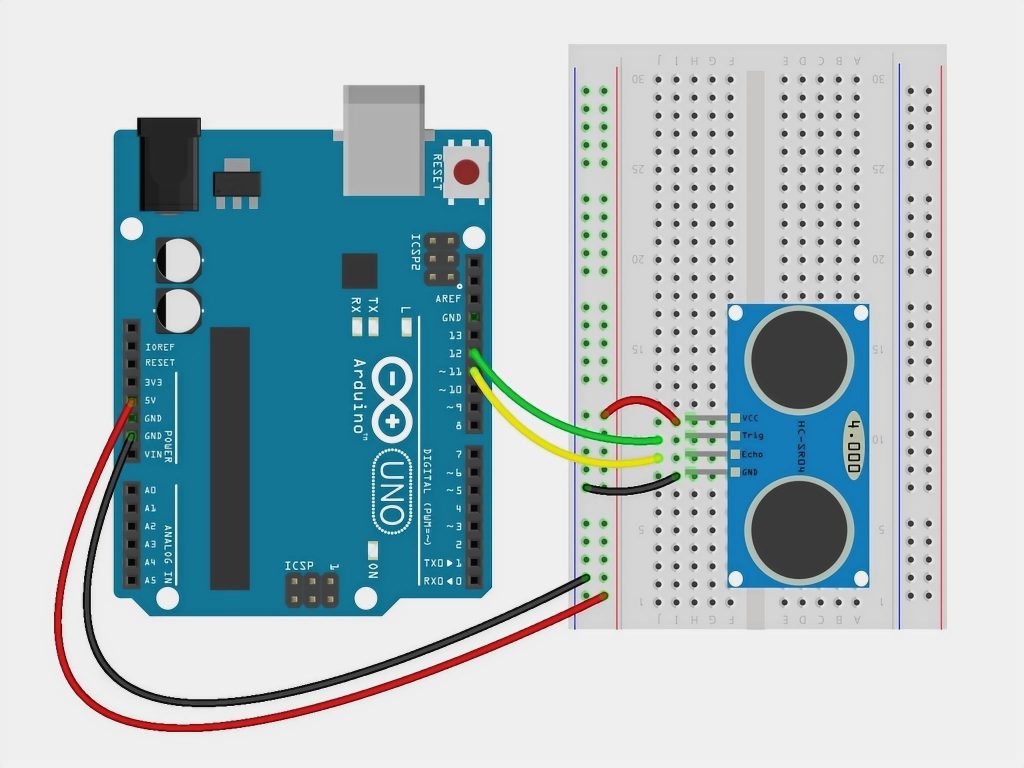
Connecting the ultrasonic distance sensor to the Arduino board is easy enough. The wiring diagram is shown in the picture.
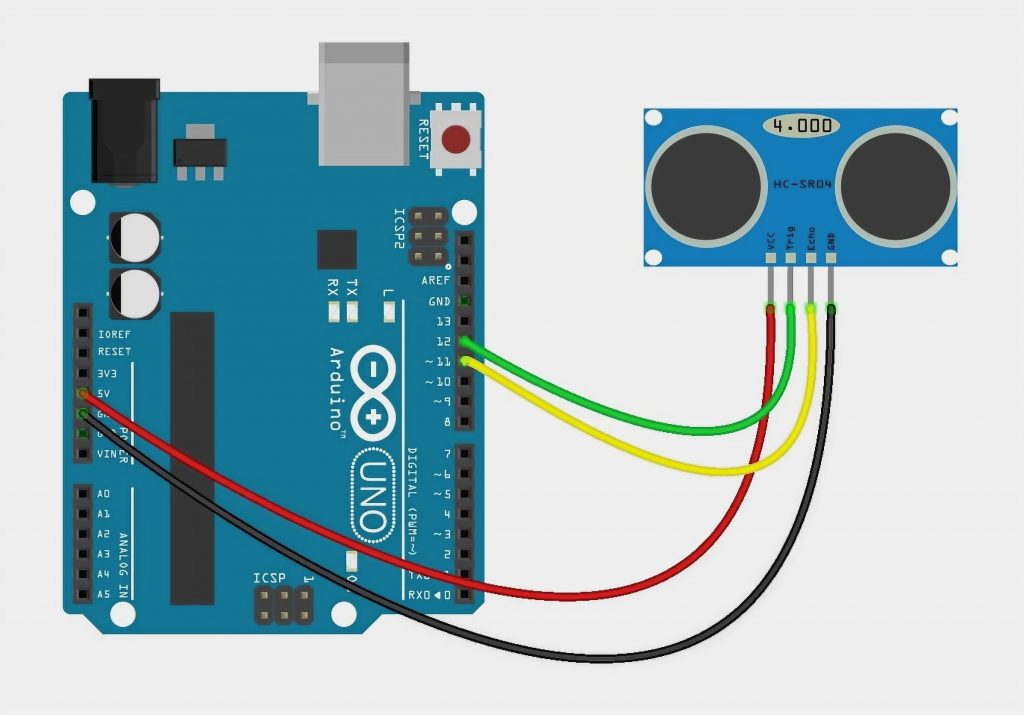
Connect the ground pin to the GND pin on the Arduino board, connect the power output to 5V. Connect the Trig and Echo outputs to the digital pins on the Arduino. A connection option using a breadboard:
Library for Working with the HC-SR04
To make working with the HC-SR04 distance sensor on the Arduino easier, you can use the NewPing library. It has no problems with ping accesses and adds some new features.
Some of the features of the library are:
- Can work with a variety of ultrasonic sensors;
- Can work with a distance sensor through just one pin;
- No 1 second lag in the absence of an echo ping;
- Built-in digital filter for easy error correction;
- Maximum accurate distance calculation.
Accuracy of Distance Measurement with the HC SR04 Sensor
The accuracy of the sensor depends on several factors:
- Temperature and humidity of the air;
- distance to the object;
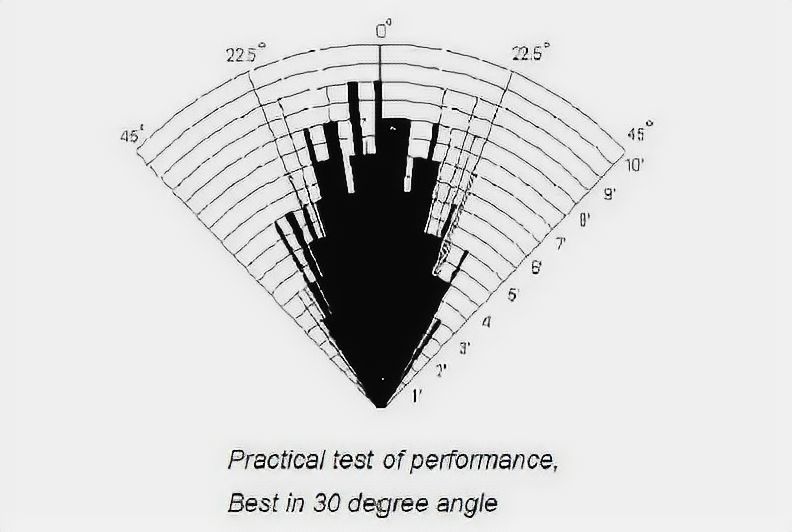
- location relative to the sensor (according to the radiation diagram);
- quality of execution of elements of the sensor module.
The principle of operation of an ultrasonic sensor is based on the phenomenon of reflection of acoustic waves propagating in the air. But as we know from physics, the speed of sound propagation in the air depends on the air’s properties (primarily on the temperature). The sensor, emitting waves, and measuring the time until their return, do not guess how environment they will propagate and calculate some average value. Due to air temperature, HC-SR04 can make an error from 1 to 3-5 cm in real conditions.
The distance factor to the object is important because of the probability of reflection from neighboring objects increases. Besides, the signal itself attenuates with distance.
Also, to increase accuracy, you need to point the sensor correctly: make sure that the object is within the cone of the radiation pattern. Simply put, the “eyes” of the HC-SR04 must look directly at the object.
In order to reduce measurement errors and inaccuracies, the following steps are usually performed:
- values are averaged (measure several times, remove spikes, then find the average);
- using sensors (e.g., DHT11 or DHT22), the temperature is determined, and correction factors are applied;
- the sensor is mounted on a servo motor, with which we “turn the head”, moving the directional diagram to the left or to the right.
Examples of Using a Distance Sensor
Let’s look at an example of a simple project with an Arduino Uno board and an HC-SR04 distance sensor. In the sketch, we will get the value of the distance to the objects and output it to the port monitor in the Arduino IDE. You can easily modify the sketch and the wiring diagram so that the sensor signals the proximity or the distance of the object.
Connecting the Sensor to the Arduino
The following pinout of the sensor connection was used when writing the sketch:
- VCC: +5V
- Trig – 12 pin
- Echo – 11 pin
- GND – Ground
An Example of a Sketch
Let’s start to work with the sensor from the beginning with the relatively complicated variant without using external libraries.
In this sketch, we do the following sequence of actions:
- With a short pulse (2-5 microseconds), we put the distance sensor into echolocation mode, in which ultrasonic waves with a frequency of 40 kHz are sent out into the surrounding space.
- Wait for the sensor to analyze the reflected signals and determine the distance according to the delay.
- Get the distance value. To do this, we wait for the HC-SR04 to give a pulse on the ECHO input, which is proportional to the distance. We determine the pulse duration using the function pulseIn, which will return the time elapsed before the signal level changes (in our case, before the return edge of the pulse appears).
- Once we have the time, we convert it to distance in centimeters by dividing the value by a constant (for the SR04 sensor, it is 29.1 for the “out” signal, the same for the “back” signal, which adds up to 58.2).
If the distance sensor does not read the signal, then the output signal’s conversion will never take the value of a short pulse – LOW. Since some sensors have different delay times depending on the manufacturer, it is recommended to set its value manually when using the above sketches (we do this at the beginning of the cycle).
If the distance is more than 118 inches, at which the HC SR04 starts to work badly, it is better to set the delay time to more than 20 ms, i.e., 25 or 30 ms.
#define PIN_TRIG 12
#define PIN_ECHO 11

long duration, cm;

void setup() {

  // Initialize serial communication

  Serial.begin (9600);
  //Determine inputs and outputs
  pinMode(PIN_TRIG, OUTPUT);
  pinMode(PIN_ECHO, INPUT);
}

void loop() {

  // First, we generate a short pulse of 2-5 microseconds.

  digitalWrite(PIN_TRIG, LOW);
  delayMicroseconds(5);
  digitalWrite(PIN_TRIG, HIGH);

  //Setting the signal level high, wait for about 10 microseconds. At this time, the sensor will send out signals with a frequency of 40 kHz.
  delayMicroseconds(10);
  digitalWrite(PIN_TRIG, LOW);

  // the delay time of the acoustic signal on the echolocator.
  duration = pulseIn(PIN_ECHO, HIGH);

  // now we have to convert the time to distance
  cm = (duration / 2) / 29.1;

  Serial.print("Distance to the object: ");
  Serial.print(cm);
  Serial.println(" cm.");

  // the delay between measurements for the sketch to work correctly
  delay(250);
}
A Sketch Using the NewPing Library
Now let’s look at the variant of the sketch using the NewPing library. The code is much simpler because all of the previously described actions are hidden inside the library. All we need to do is create an object of class NewPing, specifying the pins with which we connect the distance sensor and use the object’s methods. In our example, we need to use ping_cm() to get the distance in centimeters or ping_in() to get the distance in inches.
#include <NewPing.h>

#define PIN_TRIG 12
#define PIN_ECHO 11

#define MAX_DISTANCE 78 // A constant to determine the maximum distance we will consider correct.

// We create an object whose methods we will then use to get the distance.
// Pass the numbers of pins to which the ECHO and TRIG sensor outputs are connected as parameters

NewPing sonar(PIN_TRIG, PIN_ECHO, MAX_DISTANCE);

void setup() {
  // Initialize serial communication at 9600 speed
  Serial.begin(9600);
}

void loop() {

  // starting delay, necessary for correct operation.
  delay(50);

  // receive value from the distance sensor and store it in a variable
  unsigned int distance = sonar.ping_in();

  // print the distance in the port monitor.
  Serial.print(distance);
  Serial.println("in");

}
Connection Example of HC-SR04 Ultrasonic Rangefinder with One Pin
The HC-SR04 can be connected to the Arduino by using a single pin. This option comes in handy if you are working on a big project and you don’t have enough pins available. To connect, you just put a 2.2K resistor between the TRIG and ECHO pins and connect the TRIG pin to the Arduino.
#include <NewPing.h>

#define PIN_PING 12 // Arduino pin is connected to trigger and echo pins on the distance sensor
#define MAX_DISTANCE 200 // The maximum distance we can control (400-500cm).

NewPing sonar(PIN_PING, PIN_PING, MAX_DISTANCE); // adjust pins and maximum distance

void setup() {
  Serial.begin(9600); // The protocol is opened with data and a transmission rate of 115200 bps.
}

void loop() {

  delay(50); // 50 ms delay between generated waves. 29 ms is the minimum allowed value.
  unsigned int distanceIn = sonar.ping(); // Creating the signal, getting the parameter of its duration in µs (uS).
  Serial.print("Ping: ");
  Serial.print(distanceIn / US_ROUNDTRIP_IN); // recalculate the time parameter in the distance value and output the result (0 corresponds to exceeding the allowable limit).
  Serial.println("in");
}
Conclusions
Ultrasonic distance sensors are versatile and accurate enough that they can be used for most amateur projects. In this article, we will look at the extremely popular HC SR04 sensor, which is easy to connect to the Arduino board (two free pins should be provided at once, but there is an option to connect with one pin as well). There are several free libraries to work with a sensor (in the article, only one of them, NewPing, is described), but you can do without them – the algorithm of interaction with an internal controller of the sensor is simple enough, we showed it in this article.
Based on my own experience, I can say that the HC-SR04 sensor is accurate within 0.40 inches at distances from 4 to 78 inches. Strong interference is possible at shorter and longer distances, which strongly depends on the surrounding objects and the way of use. But in most cases, the HC-SR04 did a great job.


