
Programming the ATtiny85 with Arduino may seem daunting at first, but with the right guidance and tools, it can be a fun and rewarding experience. This microcontroller is small, affordable, and versatile, making it a popular choice for DIY projects and prototypes. In this article, we will go over the steps to program the ATtiny85 using the Arduino IDE, so you can start creating your own custom circuits and devices. Whether you’re a beginner or an experienced maker, you’ll find this guide helpful in unlocking the full potential of the ATtiny85. So let’s get started!
What is ATtiny85?
The ATtiny85 is a convenient and relatively powerful alternative to the AVR family. It is especially suitable when you want to minimize the size of your device.
The ATtiny85 chip has 8 pins – 6 I/O pins (including Reset) and 2 power pins. But how can it be programmed without a USB interface like most modern microcontroller boards? In this case, it can be programmed with an Arduino board.
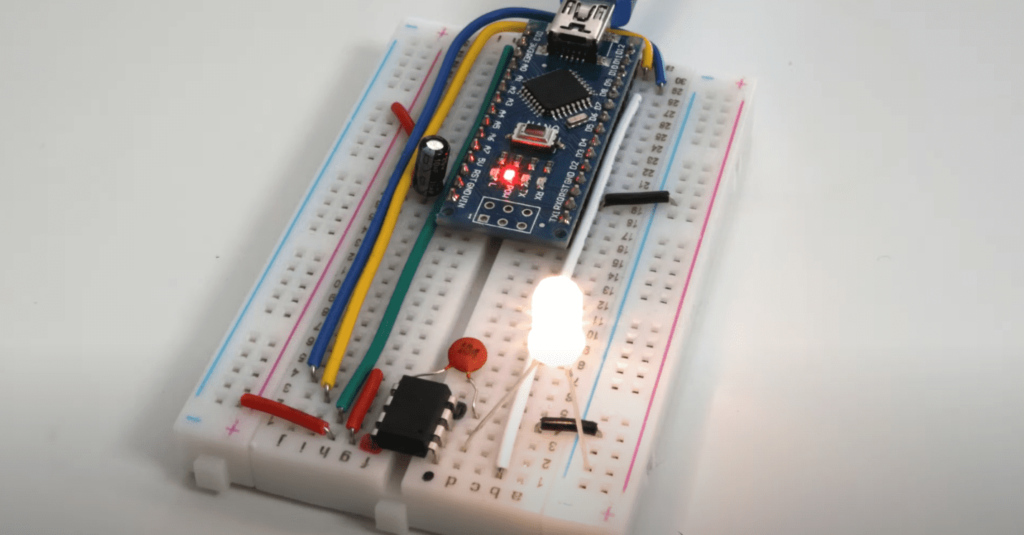
The Necessary Components
- Arduino Uno board
- ATtiny85 microcontroller
- LED
- 220 Ohm resistor
- Breadboard
- Connecting wires
ATtiny85 Specifications
The ATtiny85 is a high-performance, low-power 8-bit microcontroller based on the Advanced RISC architecture. It has 8 Kbytes of reprogrammable flash memory (program memory), 512 Bytes of EEPROM (nonvolatile memory), 512 Bytes of RAM (SRAM), 6 general purpose I/O pins 32 general purpose registers, one 8-bit timer/counter with compare mode, One 8-bit high-speed timer/counter, USI (Universal Serial Interface), internal and external interrupts, 4-channel 10-bit ADC (analog-to-digital converter), programmable watchdog timer with internal generator, 3 programmable power modes.
The pinout of the ATtiny85 microcontroller is shown in the following figure.
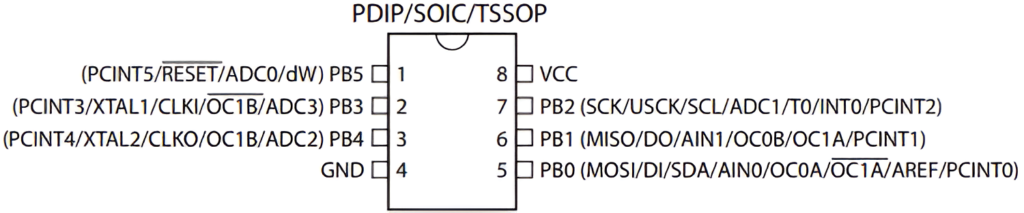
Most ATtiny85 pins can perform several functions.
A Step-By-Step Guide to Programming the ATtiny85 With an Arduino Uno Board
Step 1: Configuring the Arduino Uno Board as an ISP
Because the ATtiny85 is just a microcontroller, you need to use ISP (In-System Programming) to program it. So we need to configure Arduino Uno as ISP to be able to use it as a programmer for the ATtiny85. To do this, connect Arduino Uno to the computer and start Arduino IDE. After that, open the menu File > Example > ArduinoISP and load the ArduinoISP code into the Arduino Uno board.
Step 2: Scheme for Programming the ATtiny85
A schematic for programming the ATtiny85 with an Arduino Uno board is shown in the following figure.
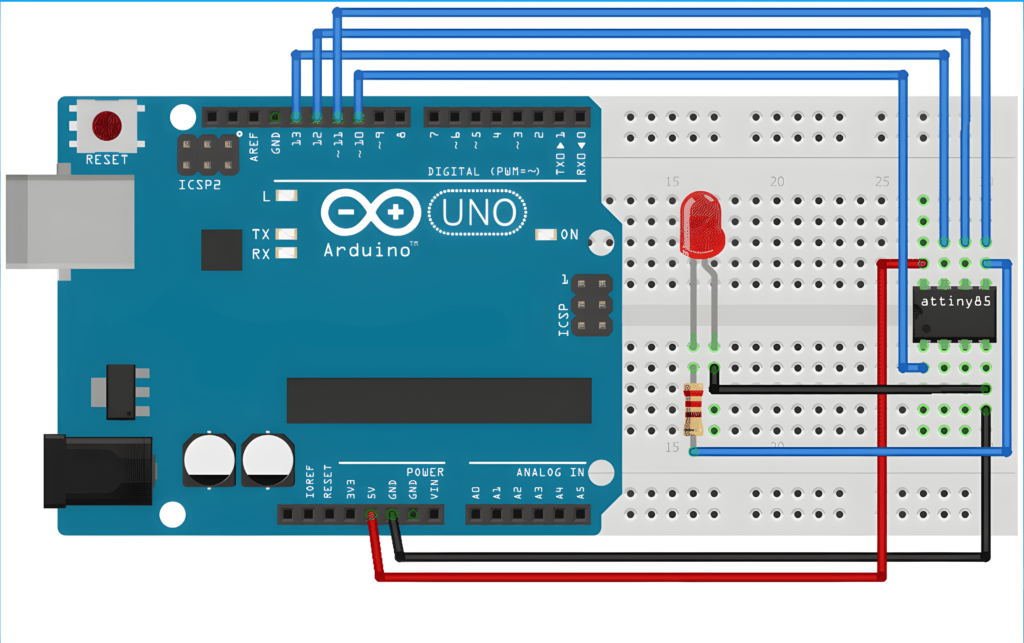
In the schematic, the positive pin of the LED is connected to pin 0 of the ATtiny85 microcontroller through a 220 Ohm resistor. The complete connection diagram is shown in the following table.
| ATtiny85 | Arduino Uno Board |
| Vcc | 5V |
| GND | GND |
| Pin 2 | 13 |
| Pin 1 | 12 |
| Pin 0 | 11 |
| Reset | 10 |
Step 3: Programming the ATtiny85 with the Arduino IDE
To program the ATtiny85 with the Arduino IDE, we first need to add ATtiny85 support to the Arduino IDE. To do this, open the File > Preferences menu, add the link below to the Additional Boards Manager URLs field, and click ‘OK.
https://raw.githubusercontent.com/damellis/attiny/ide-1.6.x-boards-manager/package_damellis_attiny_index.json
Then go to Tools > Board > Board Manager, search for ‘attiny’, and install the latest version.
After that, you will see a new item in the Arduino IDE menu – in the Board item, a sub-item with the name ‘Attiny25/45/85’ will appear.
Now open File > Examples > Basics and open the Blink example.
Change the contact number from LED_BUILTIN to 0 in this example.
Now open Tools -> Board again, select “Attiny25/45/85”, then choose ATtiny85 under Tools > Processor.
You can now load the program code into the microcontroller. If, after loading the program, the LED connected to pin 0 of the Attiny85 microcontroller starts blinking, it means that the program is loaded successfully.
FAQ
Can you program ATtiny85 with Arduino IDE?
Yes, you can program ATtiny85 with Arduino IDE. It is possible to use the Arduino IDE to program ATtiny85 by following a few simple steps. First, you need to install the ATtiny board support in the Arduino IDE. Once you have installed the board, you can select it from the Tools menu. You will then need to install the necessary drivers and libraries for the ATtiny85. With these in place, you can begin programming the ATtiny85 using the Arduino IDE, just like any other Arduino board.
What programming language is ATtiny85?
ATtiny85 is programmed using the Arduino programming language, which is a simplified version of C++. It is a popular choice for small microcontroller projects due to its low power consumption and small footprint. In addition, with its 8-bit architecture, ATtiny85 can handle simple tasks and provide basic functionality for your projects.
Does ATtiny85 have I2C?
Yes, the ATtiny85 microcontroller does support I2C communication. It features two wires, SDA (data) and SCL (clock), which are used for communicating with other devices in the I2C network. This makes it an excellent choice for projects that require communication with sensors or other peripheral devices.
Related Video: Program the ATtiny85 with Arduino 1.8.18
Final Thoughts
Programming ATtiny85 with Arduino can be a bit challenging for beginners, but it’s definitely worth the effort. With the right tools and resources, you can unlock the full potential of this tiny microcontroller and create all sorts of amazing projects. Whether you want to build a wearable device, a smart home gadget, or a robot, ATtiny85 has got you covered. So, don’t be afraid to dive in and start experimenting with this powerful and versatile platform. Who knows, you might just discover your next big idea!


