
Oh no! You just discovered a broken wire in your latest electronics project. Now what? Before you reach for the soldering iron, consider this – there are several clever ways to fix a broken wire without any soldering required. In this brief guide, we’ll explore some of the easiest no-solder wire repairs using simple tools and materials you likely have. From electrical tape to wire connectors, we’ll cover ingenious methods for restoring conductivity to your wires quickly and securely. With just a bit of know-how, you can get your project back on track in no time without ever heating a soldering tool. So read on to learn handy techniques for solder-free wire fixes that will save your wires and your patience!
Quick Summary
Fixing a broken wire without soldering is doable! Electrical tape is a quick and easy option – tightly wrap the tape around the break to secure the wires together. For a more permanent solution, use wire connectors – twist the exposed ends together tightly, screw on a connector, and cover with electrical tape. Lineman’s splicing is another method – intertwine the stripped wire ends, then twist tightly and cover with tape. Or try Western Union splicing – tie a knot in the wires to hold them together, then wrap them with tape. The key for all these no-solder fixes is to ensure the bare wire ends make solid contact – then cover the repair well with electrical tape for insulation. You can mend broken wires sans soldering with a few essential tools and techniques!
Tools and Materials
Basic Tools for No-Solder Wire Repairs
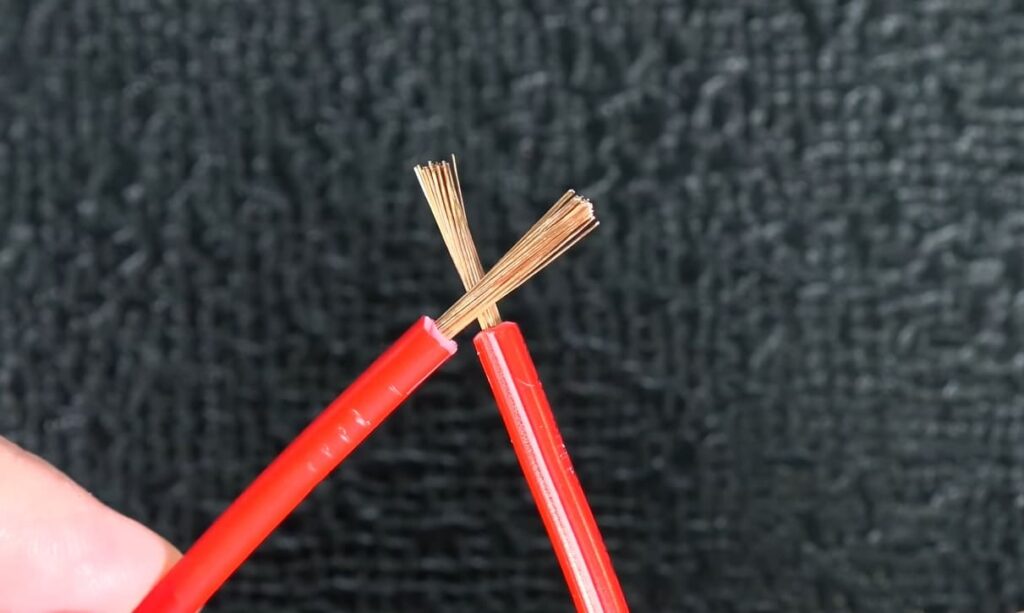
Wire strippers – A must-have tool for any wire work. Wire strippers allow you to neatly remove just the right amount of insulation to expose the inner conductors for splicing. They come in various sizes to accommodate different gauge wires. Always take care not to nick or ring the copper strands when stripping. Damaged conductors can lead to poor connections.
Needle-nose pliers – You’ll often use these to push wires into connectors, twist stranded ends together, and crimp terminals. Look for pliers with a smooth interior surface to avoid marking up wire strands during crimping. A bent-nose style helps reach into tight spaces.
Utility knife – Great for carefully slicing through the outer plastic or fabric jacket on decorative cords so you can access the inner wires without damaging the outer sheath. Extend the blade just enough to score through the jacket, then peel it back with your fingers.
Scissors – Used to trim away excess wire insulation after stripping or splice tape after wrapping a repair. Choose scissors with sharp, short blades. Dull scissors can smoosh wires instead of cutting them cleanly.
Flashlight – Essential for illuminating those dark wire repair spots. A headlamp style frees up both hands for work.

Securing Wires Together
Electrical tape – The quickest temporary fix for broken wires is to wrap electrical tape tightly around the break. Stretch the tape slightly as you wrap for a tight bond. The adhesive also helps insulate the repair. However, it can deteriorate over time.
Wire nuts – These inexpensive plastic wire joiners twist onto wire ends to secure them. Place stripped ends inside the nut and twist clockwise until tight. The internal spiral threads bite into the metal for a solid connection. Use wire nut sizes suitable for the gauge of the wires being joined.
Crimp connectors – Apply with crimping pliers to bond wires. Insert bared ends into a connector and use the pliers to permanently deform the metal terminals for a lasting grip, then tape over the connector. Choose insulated styles for splices in free air.
Terminal blocks – Offer protected screw-down terminations for wires. Insert stripped ends into the ports and tighten screw terminals onto them for a robust hands-free connection. Great for joining multiple wires or in tight enclosures.
Advanced Joining Methods
Lineman’s Splice – A time-tested method of intertwining conductor strands for strength. Twist stripped ends together, then wrap the exposed strands back over the twisted section. No tools are needed; practice!
Western Union splice involves tying an overhand knot in wires to join, then wrapping it with tape. Produces a durable, hands-free splice with experience.
Butt splices – Filled with oxidizing paste, these crimp connectors cold weld wires together for permanent, corrosion-resistant joints. Allows splicing mismatched wire sizes.
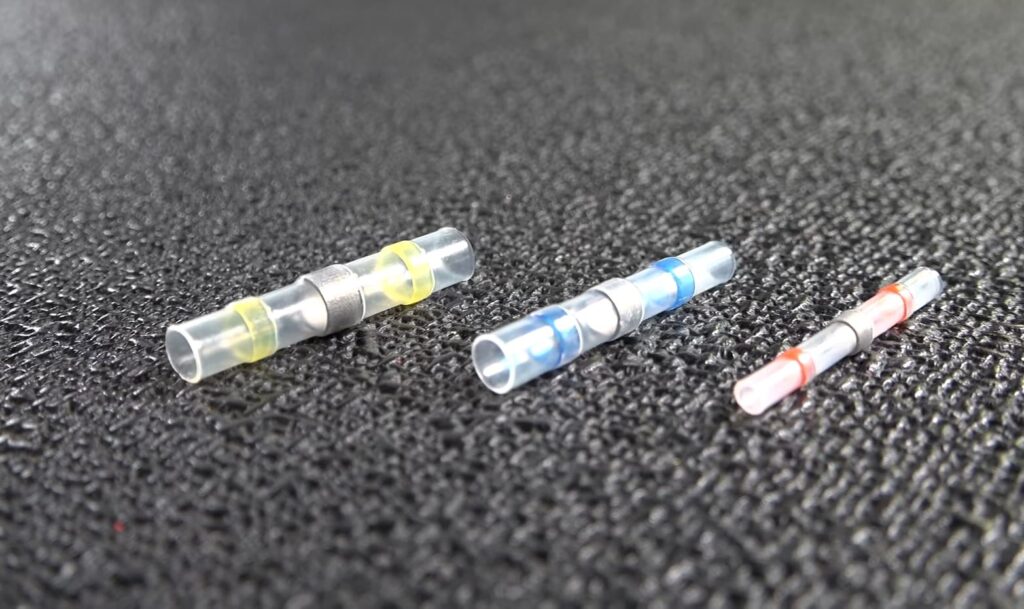
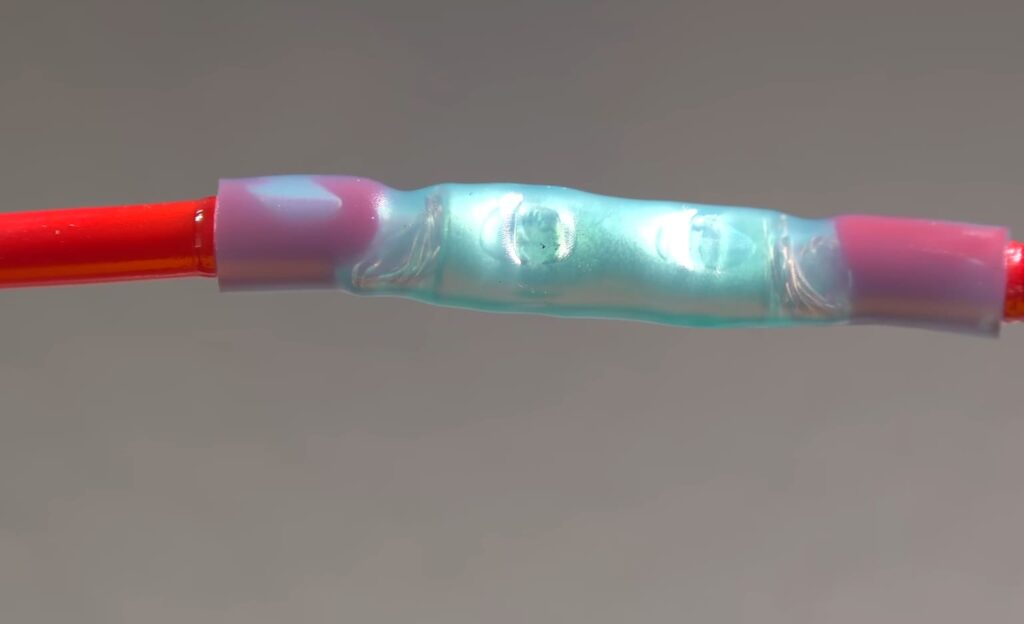
Heat shrink tubing – When heated, shrinks tightly over connections to insulate and protect. Combines with crimp connectors for lasting repairs. Flexible types allow bending after shrinking.

Insulating Repairs
Electrical tape – The go-to for covering fixed conductors. Stretch slightly while wrapping for a tight seal. Higher-quality vinyl or rubber insulating tape handles high temps better. Wrap repairs with multiple layers for longer life.
Electrical putty – This pliable, non-hardening putty can be molded around splices to seal out moisture and dirt. It remains flexible for vibration resistance. Build up putty thickness for greater insulation value.
Heat shrink tubing – Waterproof and protective, shrink tubing forms tight seals around underlying repair components when heated. Choose the proper diameter to fit over connectors or splices. Look for adhesive-lined tubing for maximum sealing.
Liquid electrical tape – Brush-on rubberized coating that dries into a flexible insulation layer. Useful for covering repairs on hard-to-tape areas. Provides abrasion protection but less insulation than regular vinyl tape.
Miscellaneous Supplies
Isopropyl alcohol – This cleaner helps prep wires before splicing or taping by removing oils and dirt for better adhesion. Also, it aids shrink tubing shrinkage.
Sandpaper or emery cloth – Lightly sanding wire conductors help remove oxidation and expose fresh metal for joining. Produces better electrical contact.
Cable ties – Helps neatly bundle and organize spliced wires after repairs are complete. Look for UV and heat-resistant ties for outdoor applications.
Digital multimeter – Essential for checking continuity across repaired wires to ensure solid electrical connections before energizing circuits.
Tips for Proper Selection and Use
- For wire strippers, ensure the size matches the wire gauge. Stripping holes that are too large can damage conductors.
- When using pliers, grip just hard enough to get the job done. Overtightening can crush delicate wire strands.
- Select electrical tape rated for the temperature range of your repair application. Vinyl tapes handle up to 80°C. Silicone goes up to 200°C.
- To help tape adhere to wires, clean them first with alcohol or gentle sanding. Dirty conductors reduce tape grip.
- Twist wires together securely before taping for a lasting repair. Tape alone is less reliable.
- Stretch tape slightly when wrapping to increase adhesion. Under-wrapped tape can become loose over time.
- Tug gently after application to confirm a tight fit when using wire nuts or crimp connectors.
- For heat shrink tubing, allow the repair area to fully cool before sliding the tubing on to avoid premature shrinkage.
With quality tools matched to wire gauge along with proper usage technique, you can achieve solid no-solder repairs that stand the test of time.
Methods
Mending severed wires without fire doesn’t require any fancy tools or tight techniques. The basic supplies already in your toolbox often allow for solid, no-solder repairs. From twist-on wire connectors to wrap-around electrical tape, you’d be surprised to see what can get a broken circuit working again.
Securing with Electrical Tape
The most straightforward approach is electrical tape. Nearly every home toolkit contains a roll, making it the handiest solution for quick fixes. To start, strip back about 1/2 inch of insulation from the severed ends. Hold the bare wires together, ensuring good contact. Begin wrapping tape tightly around the break, stretching slightly as you go to increase adhesion. Cover the repair with multiple overlapping layers for durability, sealing out moisture. While unsuitable for all permanent applications, electrical tape can salvage many broken wires in a pinch. Just be sure to keep an eye on tape-only fixes over time.
Twisting On Wire Nuts
Wire nuts twist securely onto wires to join them for a more heavy-duty, no-solder mend. These inexpensive plastic connectors contain spiral metal threads that bite into copper strands as you twist the nut clockwise onto aligned stripped ends. Wire nuts are color-coded by size to match the wire gauge. When installed correctly per size, the inner threads tightly bind the conductors. Ensure you choose an appropriately sized nut and give a firm final twist until it is snug. Finish up by tugging gently on the nut to confirm a tight fit.
Employing Specialty Crimp Connectors
For frequent wire repairs, invest in a pack of crimp connectors. Make matching cuts, exposing 1/2 inch of wire end on each side of a break. Insert the aligned copper ends fully into an open barrel connector. Use pliers to compress the metal barrel around the wires for a lasting mechanical grip inside. The connector joins the wires together, while the outer plastic insulation protects the crimped end. When properly compressed, crimp connectors make repairs nearly as sturdy as soldering.
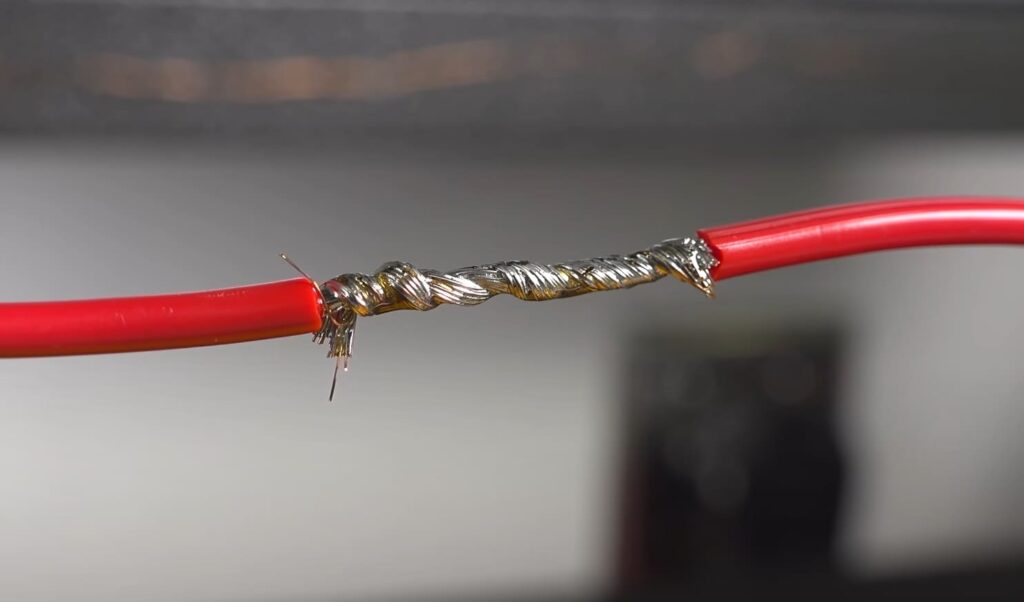
Twisting Together with the Lineman’s Splice
Electricians have long relied on the Lineman’s splice for quick wire fixes in the field. While learning the technique takes practice, it produces a very strong hands-free joint. Start by stripping back about 1 inch of insulation from each side of a break. Neatly align the bare ends and twist them tightly together with pliers. Now, here’s the key – while gripping the twisted section, use the pliers to wrap the exposed strands back over the twisted part, reinforcing the connection. Finish by firmly wrapping electrical tape around the splice. Properly executed, the interlocked strands achieve an enduring bond.
Gluing Wires Directly Together
Believe it or not, a basic hot glue gun can also remedy broken wires in certain circumstances. After stripping back the insulation, use the gun to apply a small amount of cool-temperature glue onto one wire end. Quickly press the wire ends together, holding firmly for 30 seconds as the glue cools and hardens. The adhesive helps insulate the repair as well. While unsuitable for all wires, hot glue works for light-duty mends on small gauge conductors.
The right technique tailored to your specific wire repair situation allows you to forego soldering and still achieve lasting, protective fixes. With a little preparation and practice, you can master indispensable no-solder mending skills.
Alternatives to Soldering
While soldering produces robust, long-lasting wire joints, several handy alternatives exist for the DIYer without ready access to soldering tools. Before firing up a torch or iron, consider simpler conductive bonding methods using supplies already on hand.

Hot Glue for Light-Duty
A basic hot glue gun presents an option for small, low-current mends. To employ, first strip back insulation exposing clean copper ends. Heat the gun and apply a small amount of glue onto one conductor. Swiftly join the wires end-to-end, holding firmly for 30 seconds as the adhesive cools and hardens.
- Advantages: Quick and easy for thin wires. Insulates the connection. Allows repositioning while the glue is molten. Inexpensive and readily available.
- Disadvantages: Soldering is more conductive and durable. Only suitable for light gauge wires and low amperage circuits. Hold time is short before the glue starts to set.
Conductive Epoxy Glues
Two-part epoxy adhesives infused with silver or carbon fillers provide an alternate permanent bonding method. After stripping the wires, mix a small amount of resin and hardener. Apply to wire ends, join, and hold steady for several minutes to fully cure.
- Advantages: Strongly bonded connections. Insulates against corrosion. Withstands vibration. Allows repairs where soldering is difficult.
- Disadvantages: More expensive than soldering. Cure times are longer, requiring wires to be temporarily clamped or taped during bonding—limited shelf life after mixing.
Twist-On Wire Connectors
Wire nuts offer a fast mechanical twist-on wire joining technique. Strip back insulation, align conductors, and twist the nut onto wires clockwise until firmly seated. The internal metal coil bites into the copper strands.
- Advantages: Fast installation with no tools needed. Strong grip when properly tightened. Cheap and reusable. Accommodates multiple wires.
- Disadvantages: Not as conductive through the spiral threads. It can loosen over time if not adequately tightened initially and is limited to solid or stranded wires only.
Crimp Connectors
Crimp sleeves permanently compress onto wires for solid yet reversible connections. Strip the back ends, insert them into the connector, and crimp the metal sleeve tightly shut with pliers.
- Advantages: Quick to install with basic tools. Reliable when properly crimped. Allows joining different wire types and sizes. Produces gas-tight seal.
- Disadvantages: Requires buying connectors and specialty crimping tools. If correctly done, the joint may succeed over time. It’s not removable once crimped.
Terminal Block Connectors
Terminal blocks offer protected screw-down terminations for wires. Strip ends, insert into ports, and tighten screw flanges onto the metal.
- Advantages: Solid connection with no special tools. Allows many easy tap-offs. Wires are contained and separated. Vibration resistant.
- Disadvantages: Bulky for some applications. Initial blocks cost more than basic connectors. Individual ports are limited to certain wire sizes.
With the right technique, many household alternatives exist to achieve solid wire connections without pulling out the soldering gear. Evaluate your specific repair conditions and conductor types to select the optimal fastening method.
Safety Precautions
When it comes to dealing with electrical repairs, safety should always be the top priority. Faulty wiring poses serious risks, including potential electrocution, fires, and equipment damage. It’s critical to take proper precautions any time you work on severed wires.
Turn Off Power at the Source
Before attempting to fix a broken wire, verify the circuit is de-energized. Locate the supply breaker or fuse powering the conductor and switch it to OFF. Use a non-contact voltage tester to double-check that the wires are dead. Only work on confirmed de-powered wires to avoid accidental shocks.
Wear Protective Equipment
Even with circuits off, always don safety gear as an extra precaution. At a minimum, wear electrical gloves and eye protection when handling bare wires. For extensive rewiring, an arc flash jacket, hood, and hearing protection add further shielding. Treat all wires as potentially live until tested.
Call a Professional When Unsure
If you lack experience with electrical systems, err on caution and call an electrician. Professionals have the tools and know-how to diagnose and repair broken wiring safely. Don’t risk injury by attempting complex fixes you’re uncomfortable with. There’s no shame in seeking expert assistance.
FAQ
What are some quick ways to temporarily fix a broken wire?
If you need a quick temporary fix for a broken wire, electrical tape, and heat shrink tubing are good options. To use electrical tape, tightly wrap it around the break in the wire to hold the ends together. The tape will provide insulation and keep the wire protected. Heat shrink tubing works similarly – slide it over the broken area and apply heat to shrink it tightly around the break. These temporary solutions can take you time until you have the supplies to mend the wire permanently. Just be sure to keep an eye on taped repairs, as the adhesive can come loose over time.
How does Western Union splicing work to mend broken wires?
Western Union splicing is a technique electricians have used for decades to join wires without soldering. First, strip back insulation on both sides of the break to expose the inner conductors. Hold the wires together so the bare ends overlap slightly, and make about four tight twists of the wires around each other. This binds the conductors together mechanically. Next, tie an overhand knot over the twisted section to prevent it from unraveling. Finally, wrap the splice with electrical or other insulation tape to complete the repair. With some practice, Western Union splicing creates a strong connection that stands the test of time.
Related Video: Never Solder Again – How to Connect Wires the EASY Way
Conclusion
In summary, there are several effective options for repairing a broken wire without having to pull out your soldering iron. Electrical tape provides a quick and temporary solution, while wire connectors create a more heavy-duty and permanent fix. Lineman’s splicing is an easy wire-to-wire mend that tightly intertwines the broken ends before taping. And for those with practice, Western Union splicing ties the wires in a secure knot. The key is exposing just enough bare wire to make a solid connection before insulating the repair with tape. You can salvage your broken wires and avoid soldering with the right materials and techniques. So next time you encounter a severed circuit, don’t sweat it – put these no-solder wire fixes to work and get your project back on track.


