
If your project needs to provide loading of audio, video, graphics, recording of any data, the question of external memory arises.
In most microcontrollers, the built-in memory is minimal. For example, even the Arduino Mega chip (Atmega2560, check pinout here) provides only 4 kilobytes of EEPROM for data storage. Of course, the bigger flash memory is 256 kilobytes, but there are problems with recording when using it. The most trivial thing is that you can accidentally overwrite the program itself downloaded to the board.
When downloading graphic or music files, you will surely need at least 1 megabyte of storage. What if more information is downloaded? In this case, you can use the same tools as in modern video cameras, smartphones, mp3 players: a memory card!
Memory cards are often called SD or microSD cards, and they allow you to store gigabytes of information. Memory cards are sold in any electronics store, so there are no problems with the purchase. Also, most computers have card readers, so there will be no problem with transferring information.
What you need to know when using SD cards with Arduino
The first. Cards are designed for 3.3 V. Amperage can reach large values: up to 100 mA and even more when recording data! This means that you have to provide a quality 3.3 V power supply for the card. Besides, it is necessary to have a 3.3 V power supply for logic. SD cards are very sensitive – the use of resistors and long conductors when connecting leads to a significant drop in data rate. So use the shortest possible connectors and avoid resistors in the logic power supply circuit. Instead, you can use level transmitters based on HEF4050, 74LVX245, or 74AHC125 chips.
Second. There are two modes: SPI and SDIO. SDIO runs faster but is difficult to implement with Arduino. The SPI mode is much easier to set up with any microcontroller. You only need four pins to connect in SPI mode (we will look at this issue further).
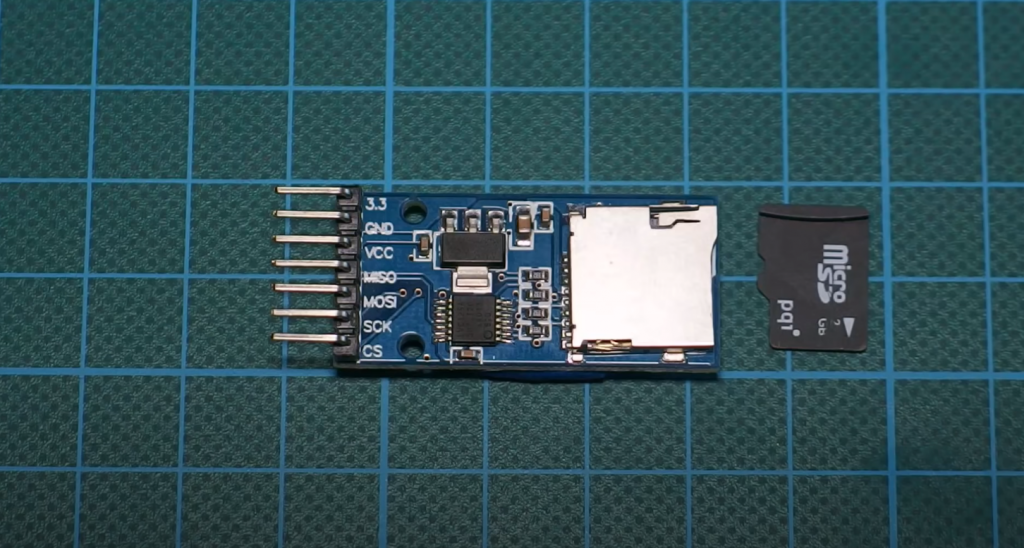
SD cards are available in two form factors: microSD and SD. Connection, program, structure, etc. For them are the same. The only difference is the size. Micro SD card is much smaller in size.
The third. SD card is a chip with separate sectors. That is a certain structure that you must use no. This means that the card can be formatted as a file system Linux, GFAT (DOS), or Mac. It may not have a file system at all! However, 99% of computers, cameras, MP-3 players, GPS navigators require a file system format FAT16 or FAT32 for use. The problem is that microcontrollers like the Arduino allocate a relatively large percentage of memory when working with complex file systems.
Formatting an SD card
In principle, you can use an SD card without a file system, but it is not very convenient. It is better to use the FAT16 or FAT32 format to work with Arduino. This is mainly due to the availability of appropriate libraries: some support one format, some support another. The Arduino SD library supports both formats.
When buying a new SE card is highly likely that it will already be formatted for the FAT file system. Problems may still occur. It is not known how the manufacturer formatted it. If the card is old, it is desirable to check it too. The Arduino SD library that we will use supports both FAT16 and FAT32 formats. For example, if you have a small card, 8-32 megabytes, it can be formatted for FAT12, which is not supported. You will have to format it as 16 or 32. In general, we recommend that you format the card before using it in any case.
For example, you can use this program for formatting: SD Card Formatter. The download page has instructions for using the program. You should not have any problems.
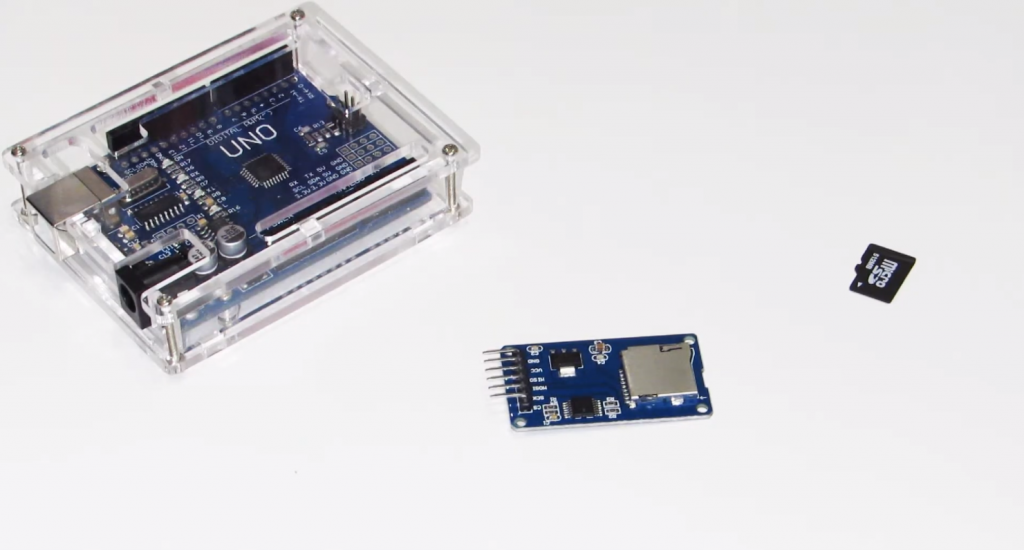
Connecting the SD-card module to Arduino
After preliminary preparation of the SD card, we can begin to connect the microSD and Arduino expansion board. The expansion card makes the connection much easier. It has a regulator that converts the voltage of 3.3 – 6 V to 3.3 V (I2C). There is a level regulator that converts the logic power supply from 3.3 – 5 V to 3.3 V. This means that the expansion board can be used with 3.3V and 5V microcontrollers.
In our example, an Arduino microcontroller is used. If you are using a different microcontroller, the wiring diagram and code may be different.
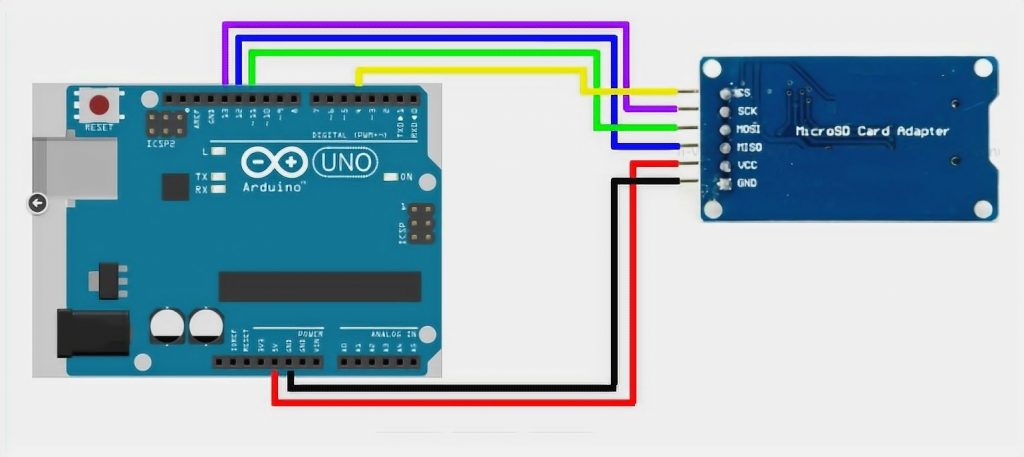
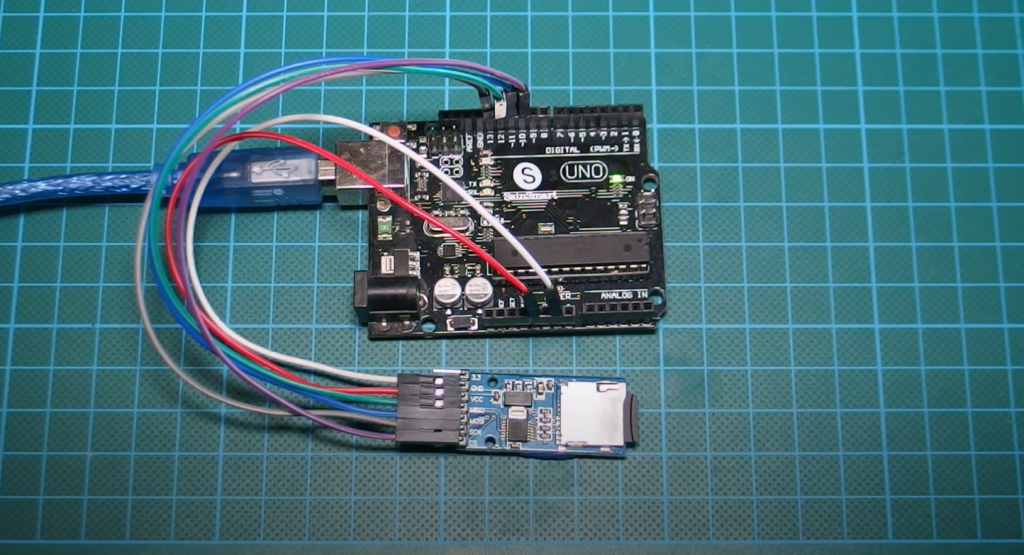
It is best to connect an SD card to the hardware SPI pin because a lot of data is transferred when using it. On “classic” Arduino boards (Duemilanove/Diecimila/Uno), it is digital pin 13 (SCK), 12 (MISO), and 11 (MOSI). You will also need a fourth pin for the ‘chip/slave select’ (SS) circuit. Traditionally, 10 pin is used, but you can also use another pin. Note that if you have an Arduino Mega board, the pin will be different! In this case, use 50 (MISO), 51 (MOSI), 52 (SCK), and 53 (SS) for the CS circuit. Again, you can change the SS pin (10 or 53). But for the first time, it is recommended to connect in this way for correct code development, which will be shown below.
- Connect a 5V pin to a 5V pin on the Arduino
- Connect GND pin to GND pin on Arduino
- Connect Pin CLK to Pin 13 or 52
- Connect DO to Pin 12 or 50
- Connect DI to Pin 11 or 51
- Connect CS to Pin 10 or 53
There is another connector – CD is a pin for initializing the SD card. It closes to the ground when the card is installed. If you want to activate it, connect a pull-up resistor (about 10 kOhm) and on to another pin. In this example, we will not consider this option.
Loading the library and starting the SD card for the first time
Transmitting data to an SD card is a large piece of code, but luckily for us, there is a library integrated with the Arduino IDE called SD (name to a point, isn’t it? :)). You can find this library in the Examples submenu. In the Examples submenu, select the CardInfo sketch.
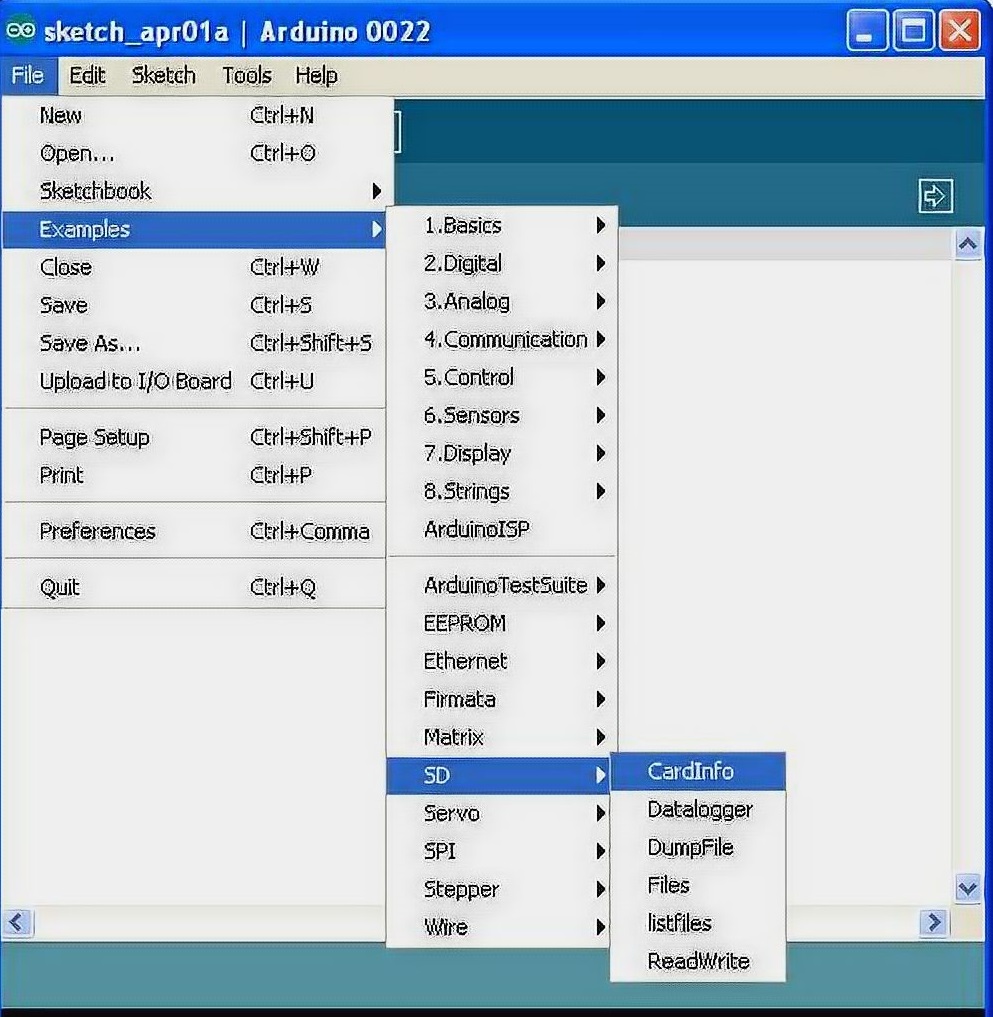
With this sketch, you will not be able to transfer data and just answer whether the connected SD card is recognized. This is a very useful sketch if you want to know if your card is supported. Be sure to do this check before working with a new card!
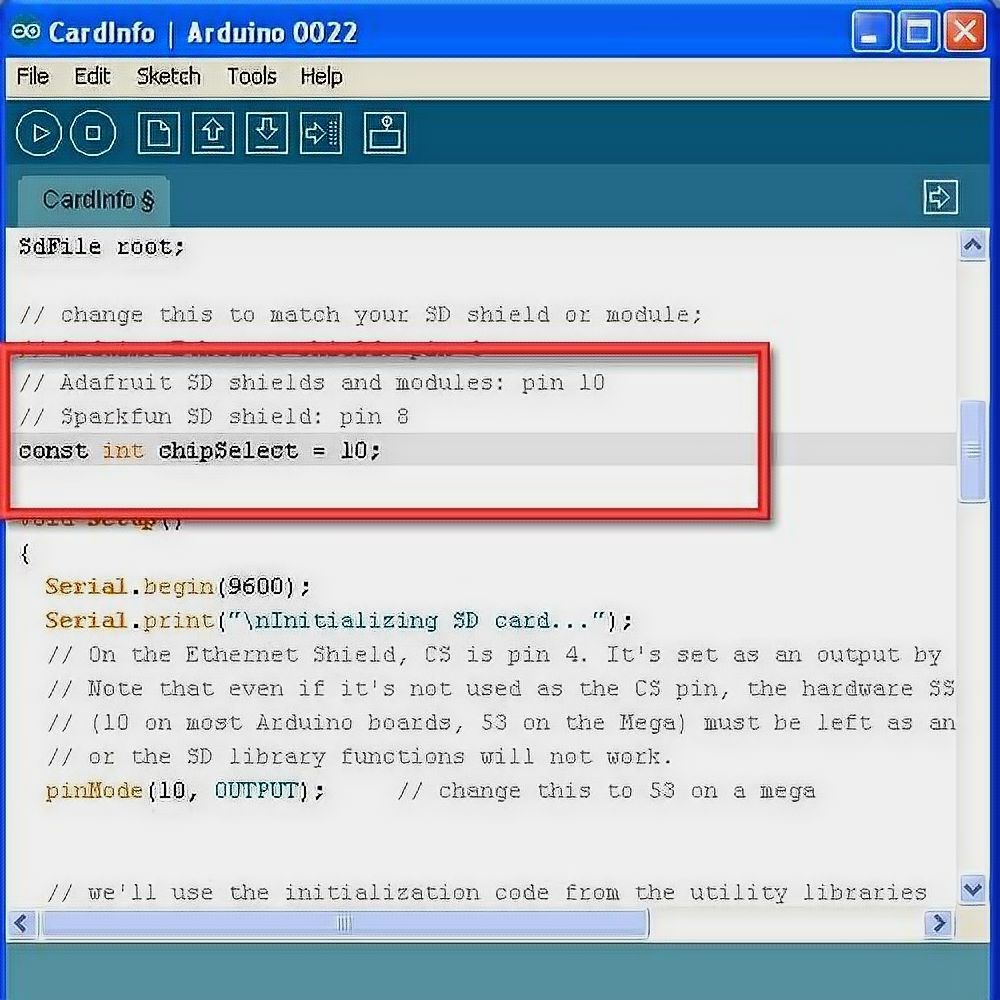
At the beginning of the sketch, check the chipSelect variable. In this example, we connect to 10 pins, so the variable takes 10.
Now we install the SD card in the expansion card and load the sketch.
Open the serial monitor window in the Arduino IDE, type some symbol, and press Send. You will most likely see something like this:
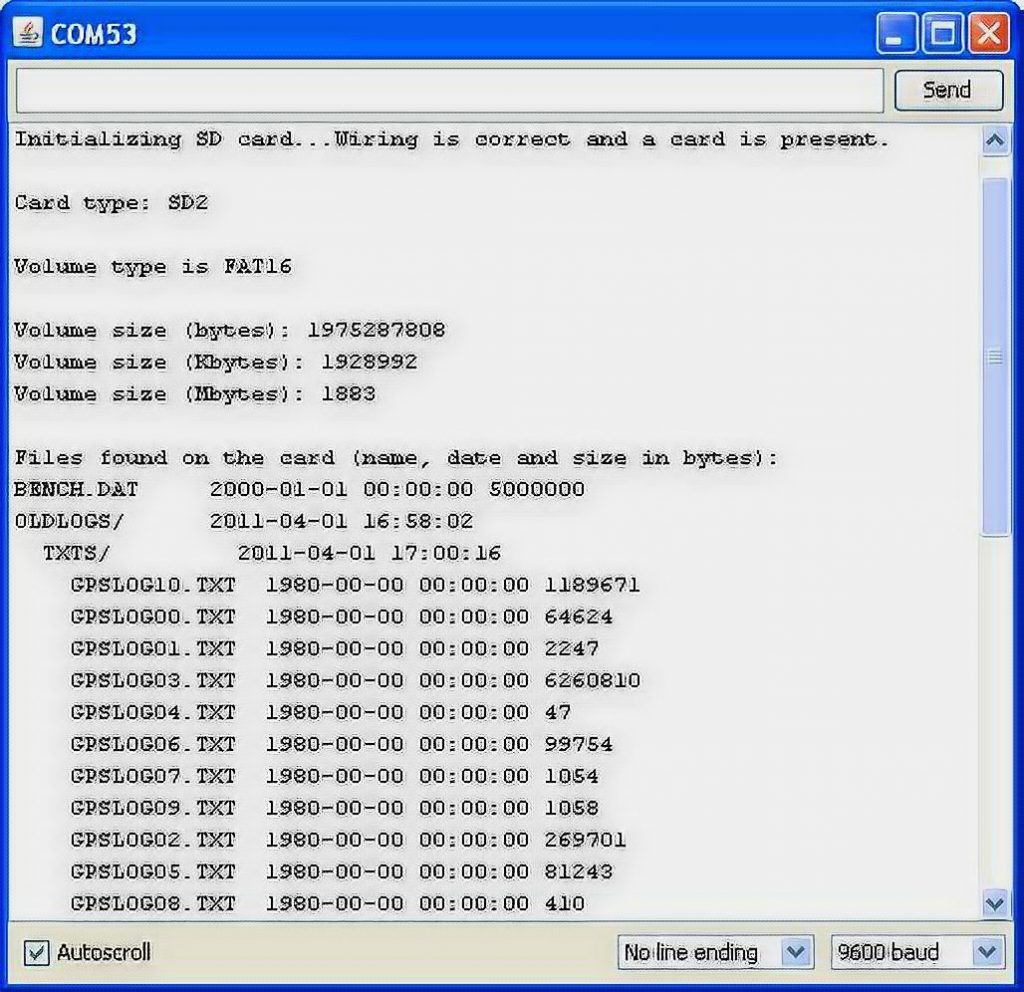
Please note that the file system type is FAT16, card size (about 2 GB, which in this case is true), etc.
If you get a bad SD card (first of all, these are cards from unknown manufacturers), you will see something like this:
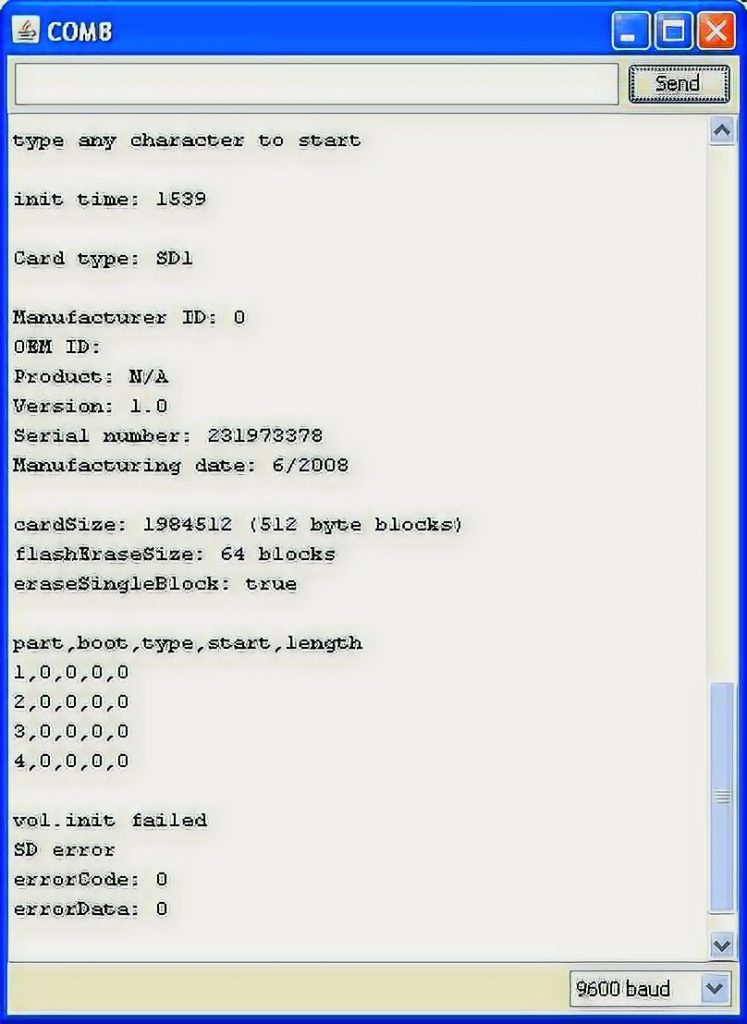
In this example, the SD card responds to requests, but it is not correct. Note that next to the Product ID, you will see “N/A”, no Manufacturer ID, and no OEM ID. In addition, the card returns the SD errors. In general, the card is inoperable. You can try to format it. If there are no errors after formatting, you will not be able to use it.
Try to remove the SD card and start the program again. The following will appear in the Serial Monitor window:
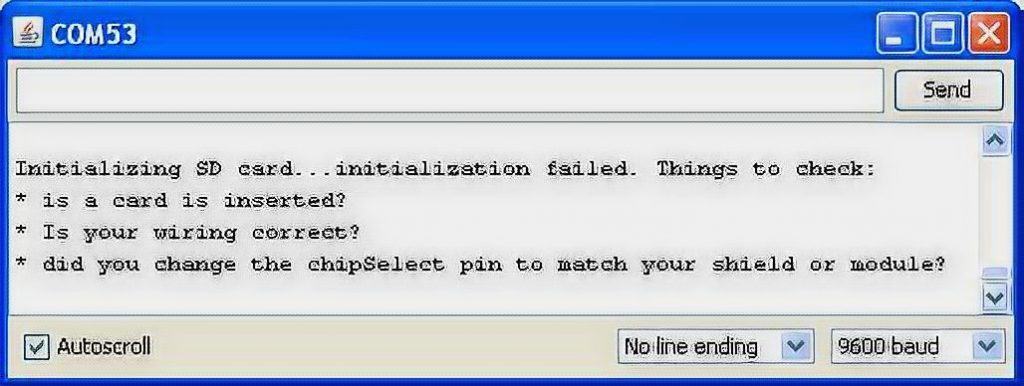
These errors appear if you can’t even initialize the card. First possible cause: The card is damaged. Second: The SD card module is not properly connected to the Arduino.
Recording data to the SD card via the Arduino
The above sketch demonstrates the basic capabilities for writing data to the card. In fact, this is the basis for working with the SD card module.
#include <SD.h>

File myFile;

void setup()

{

Serial.begin(9600);

Serial.print ("Initializing SD card...");

// on Ethernet shield CS corresponds to 4 pins. By default, it is set to output mode

// note that if it is not used as a CS pin, SS pin on the equipment

// (10 on most Arduino boards, 53 on Arduino Mega) should be left in output mode.

// otherwise SD library functions will not work.

pinMode(10, OUTPUT);

if (!SD.begin(10)) {

Serial.println("initialization failed!");

return;

}

Serial.println("initialization done.");

// open the file. Note that you cannot open several files in parallel.

// before opening a new file, the old one must be closed

myFile = SD.open("test.txt", FILE_WRITE);

// if you manage to open the file, write to it:

if (myFile) {

Serial.print ("Writing to test.txt...");

myFile.println("testing 1, 2, 3.");

// close the file:

myFile.close();

Serial.println("done.");

} else {

// if the file did not open, we will display an error message:

Serial.println("error opening test.txt");

}

}

void loop()

{

// nothing happens after setup

}
When you run the sketch to execute it, you will see the following:
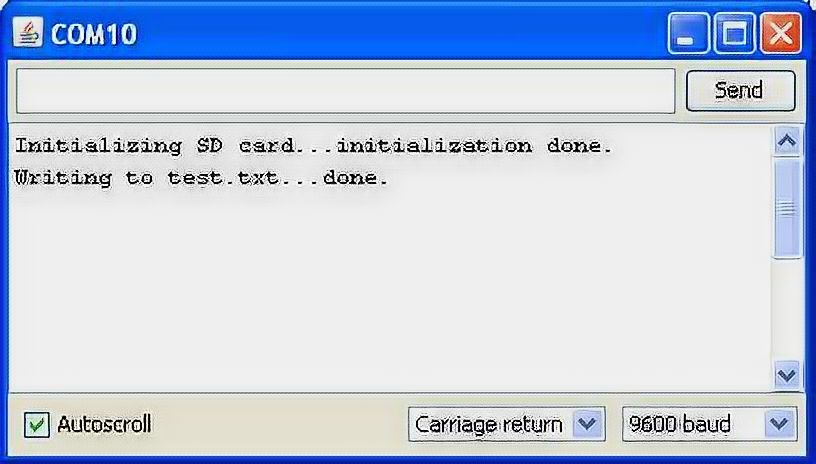
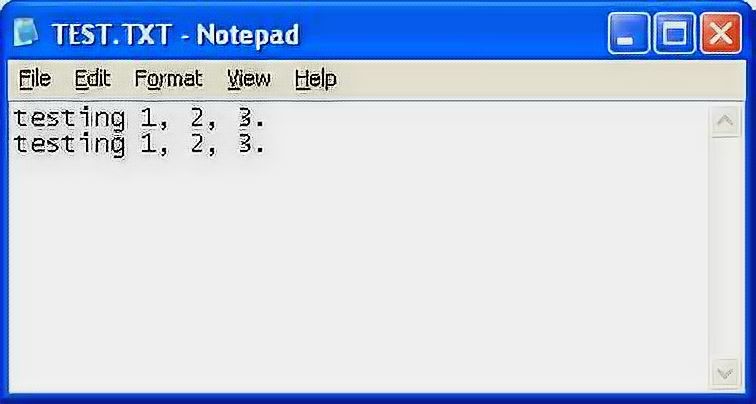
After working on the sketch, you can open the generated file on your personal computer. Each line corresponds to one program cycle. That is, the data is added, not rewritten.
It is worth noting a few things:
- You can open several files at the same time and write them to the one you choose.
- The print and
println()functions are used for writing strings, variables, etc. - You must
close()the file(s) when you are finished so that the data is accurately recorded! - You can open files from subfolders. For example, if you want to open a file that is at
/MyFiles/example.txt, you can callSD.open("/myfiles/example.txt"), and everything will work fine.
The SD card library does not support ‘long names’, so file names should be short! For example, IMAGE.JPG is a great name; datalog.txt is also a good name. But something like “My GPS log file.text” will not work! Also, note that the names are case insensitive. That is, datalog.txt is the same as DataLog.Txt or DATALOG.TXT.
Read data from SD card via Arduino
Now let’s see how we can read information from a file that is stored on the card. The process is very similar to writing. We will use the function SD.open() with the file name. You can call the function available() (which will tell you if the card has information to read) and read() from the file, which will return the next byte.
#include <SD.h>

File myFile;

void setup()

{

Serial.begin(9600);

Serial.print ("Initializing SD card...");

// on Ethernet shield CS corresponds to 4 pins. By default, it is set to output mode

// note that if it is not used as a CS pin, SS pin on the equipment

// (10 on most Arduino boards, 53 on Arduino Mega) should be left in output mode.

// otherwise SD library functions will not work.

pinMode(10, OUTPUT);

if (!SD.begin(10)) {

Serial.println("initialization failed!");

return;

}

Serial.println("initialization done.");

// open the file to read the data:

myFile = SD.open("test.txt");

if (myFile) {

Serial.println("test.txt:");

// read all data from the file:

while (myFile.available()) {

Serial.write(myFile.read());

}

// close the file:

myFile.close();

} else {

// if the file has not opened, we display an error message:

Serial.println("error opening test.txt");

}

}

void loop()

{

// nothing happens after setup

}
Some important notes:
- You can keep several files open at the same time and read out the information you need.
Read()returns a byte per unit of time. The function does not read the whole line!- In the end, you should use the
close()function to close files to reduce the amount of memory used by RAM.
Recursive writing/reading information from files
In this article, we will consider an example of the more “advanced” use of SD cards. For example, we wait until all the files on the SD card are read or play a music file with endless repetition. In recent versions of the SD library, you can navigate through folders and call the next available file using the openNextFile() function. Files are not opened in alphabetical order, but according to their creation time!
Run a sample SD → listfiles sketch.
There you will find the ANIM subfolder (it contains files with animation). The numbers after the file name characterize the file size in bytes. This is a very useful program if you want to check which files are called from your card.

Other useful functions
There are other useful features for working with the SD card. Some of them we will show below:
- If you want to check if the file is on the card, use the function
SD.exists("file_name.txt"), which will returntrueorfalse. - You can delete the file using the function
SD.remove("file_name.txt"). But be careful! File to delete completely. There will be no “trash can” or backup for recovery. - You can create a subfolder using the function
SD.mkdir("/name_name_new_folder"). It is very convenient to structure your data at the initial level. If a folder with this name already exists, nothing will happen. Do not forget that you can use the functionSD.mkdir()before creating a folder to check.
Several useful functions for working with files:
- To move the pointer when reading/writing a file, the
seek()function is used. For example, writing a function asseek(0)will move you to the beginning of a file. - The
position()function will let you know exactly where you are within the file at the moment. - The
size()function will give you information about the size of the file in bytes. - You can call the
isDirectory()function to find out if a file on the card is a directory. - Consistent work with files that are in a folder is implemented by calling the
openNextFile()function. - You may need the file name. For example, if you call the next file in the folder with
openNextFile(). In this case, you can use thename()function, which will return an array of character data that can be displayed directly in the Arduino IDE serial monitor usingSerial.print().


Very nice work guys!
I found very usefull information
Thanks.
Thanks for your comment!
I’ve gotten my SD reader attached to an Arduino Uno. The CardInfo program sees the card and tells me it is type SDHC, but then can’t find the FAT partition. I’ve reformatted the card twice on my PC, and once in a camera I have, and it hasn’t helped. The card is an 8Gb version.
Any suggestions?
Using an SD card with an Arduino can sometimes lead to issues with the Arduino not properly recognizing the FAT partition on the card. However, there are several troubleshooting steps you can take to try resolving this problem.
The key things to try are updating libraries, checking connections, and testing with different cards/computers. If the issue persists across multiple cards and computers, it may be a hardware incompatibility. But in most cases, the solutions above should help resolve the problem. Let me know if you have any other questions!