
DHT11 and DHT22 sensors are very popular in the Arduino environment and are often used in weather stations and smart home projects. In this article, we will learn how to use these sensors, how to connect to Arduino Uno, Mega, or Nano boards correctly, and which libraries to use for writing a sketch. These sensors do not stand out for special speed and accuracy, but they are easy to use. You can safely use them in your first projects due to their availability and low price.
Characteristics and Connection of DHT11 and DHT22
The sensor consists of two parts, a capacitive temperature sensor, and a hygrometer. The first one is used to measure the temperature, the second one to measure the air humidity. The chip inside can perform analog-to-digital conversions and produce a digital signal, which is read by a microcontroller.
In most cases, the DHT11 or DHT22 is available in two versions: a single sensor in a plastic housing with metal contacts or a complete module with a sensor and soldered wiring elements. The second option is much easier to use in real projects and is highly recommended for beginners.
DHT11 Sensor
- Current consumption is 2.5 mA (maximum value when converting data);
- Measures humidity within a range of 20% to 80%. Accuracy can be up to 5%;
- Applicable for temperature measurement in the range from 0 to 50 degrees (accuracy of 2%);
- Dimensions: 15.5 mm long; 12 mm wide; 5.5 mm high;
- Power supply – from 3 to 5 volt;
- One measurement per unit of time (second). That is, the frequency is 1 Hz;
- Four connectors. The distance between adjacent connectors is 0,1 “.
DHT22 Sensor
- A power supply is 3 to 5 volt;
- Maximum current at conversion – 2.5 mA;
- Capable of measuring humidity in the range from 0% to 100%. Measuring accuracy ranges from 2% to 5%;
- The minimum temperature measured – minus 40, the maximum – 125 degrees Celsius (measurement accuracy – 0.5);
- The device is capable of making one measurement in 2 seconds. The frequency is up to 0.5 Hz;
- Dimensions: 15.1 mm long; 25 mm wide; 5.5 mm high (1.05″ x 2.32″ x 0.53″);
- There are four connectors. The distance between adjacent ones is 0.1′;
Obviously, when using the DHT11 temperature and humidity sensor in the Arduino, the device will give less accurate values than the DHT22. The analog has a larger measuring range, but the price is the same. The temperature and humidity sensor DHT22, like its counterpart, has one digital output so that readings can be taken not more often than once every 1-2 seconds.
Connecting the DHT11 Sensor to the Arduino Uno
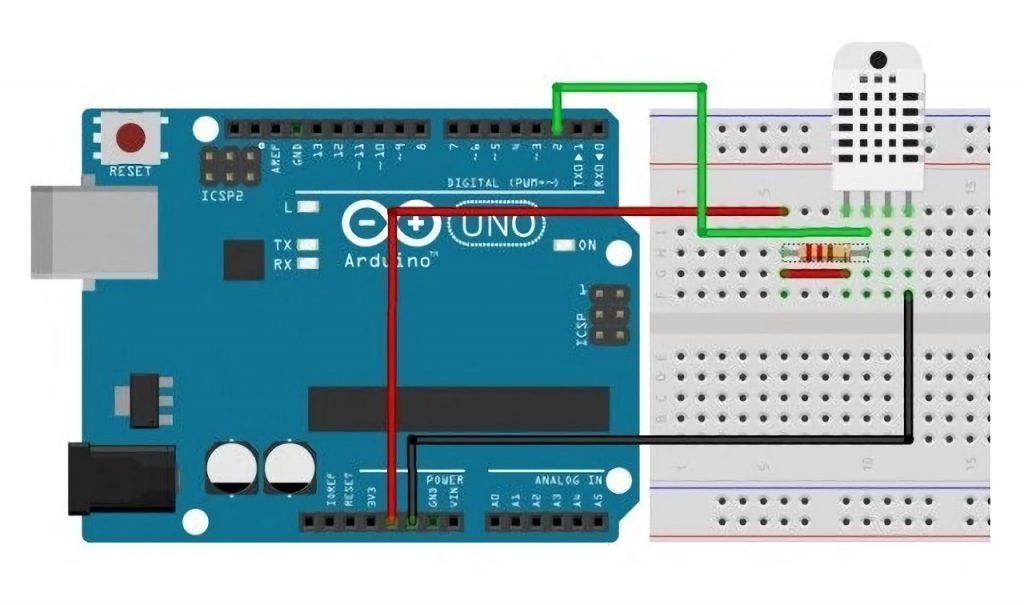
If you only have the sensor itself (a blue “lattice” plastic box with four metal contacts), you will need the following parts to connect the DHT11:
- An Arduino board (or other microcontrollers that supports microsecond timing);
- An assembly board (breadboard);
- A pull-up resistor with a rating of 10kOhm;
- LEDs.
DHT11 pin description:
- Power;
- Data output;
- Not used;
- Ground (GND).
The pins are numbered from left to right if the sensor housing is in front of you on the grille side and the “legs” are at the bottom. You must solder a 10k resistor between the signal outputs and the power supply for the sensor to work properly.
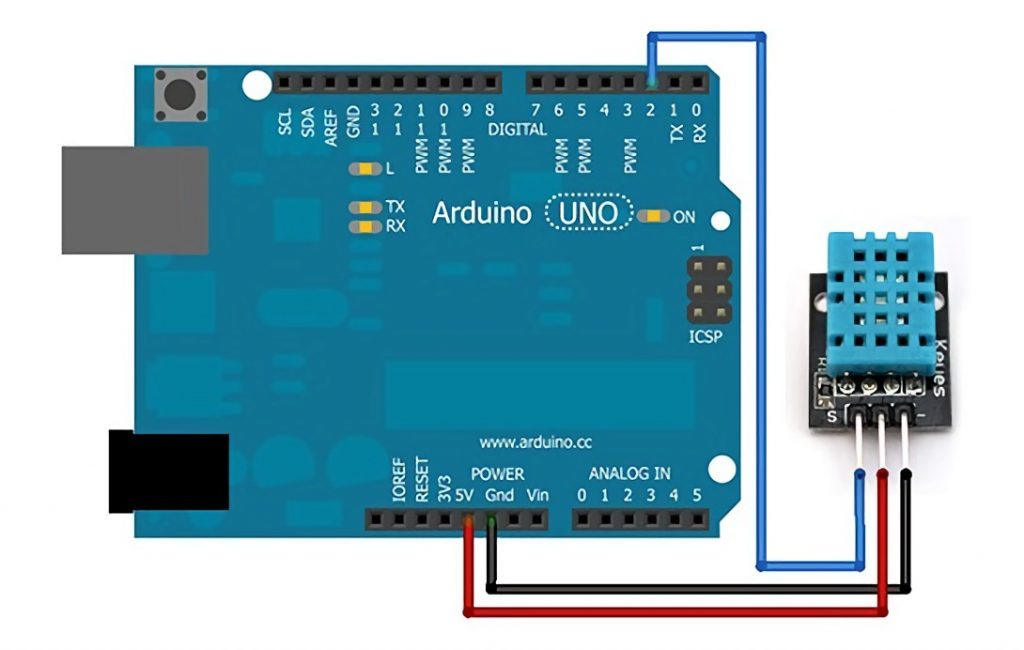
If you have a ready-made sensor module in your hands, connecting it to the Arduino is extremely easy: you connect VCC to +5V, GND to ground, and the third pin to any available pin on the Arduino board. The pin number must then be specified in the sketch. This way, you can connect the sensor to different Arduino boards: Uno, Arduino Mega, Arduino Nano, Pro Mini, and others.
Connection of the sensor module is made according to the following scheme:
| Sensor DHT22/DHT11 | Arduino |
| + | +5V |
| out | such as 2 |
| – | GND |
It is recommended to connect the signal from the humidity sensor DHT11/DHT22 to the second pin to match the circuit of the example sketch below. If you have a different sketch, you can edit the code accordingly and change the pin (example below). Additional resistors are also connected (this step can be omitted since the board already has a resistor installed).
Connecting the DHT22 Sensor to the Arduino Mega
A single-wire interface is used to connect the DHT22 humidity and temperature sensor module to the Arduino Mega board. Power for the sensor is also taken from the Arduino board. For a convenient connection to the Arduino Mega board, it is best to use the MEGA Sensor Shield expansion board.

For reading the data of the DTH22 sensor with Arduino, there is a ready-made library DHT. To install it, you have to copy the folder with the library files to the libraries directory of your Arduino IDE.
Sketch for Working with DHT11 and DHT22 Sensors in Arduino
Before writing the sketch, let’s make sure that we have the library for working with humidity and temperature sensors installed. Download it from GitHub. A folder called “DHT-sensor-library-master” will be downloaded. It must be renamed to DHT and moved to the libraries folder in the Arduino IDE root folder. Next, you need to load a ready-made sketch or write one yourself using the examples. A typical Arduino sketch for working with DHT11 and DHT22 looks like this:
#include "DHT.h"
#define DHTPIN 2 // The same pin number mentioned above
// One of the following lines is commented out. Remove the comment if you connect the DHT11 sensor to the Arduino
DHT dht(DHTPIN, DHT22); //Sensor initiation
//DHT dht(DHTPIN, DHT11);
void setup() {
  Serial.begin(9600);
  dht.begin();
}
void loop() {
  delay(2000); // 2 sec delay
  float h = dht.readHumidity(); //measure humidity
  float t = dht.readTemperature(); //measure temperature
  if (isnan(h) || isnan(t)) { //Check. If the reading fails, then "Read error" is displayed and the program exits
    Serial.println("Reading error");
    return;
  }
  Serial.print("Humidity: ");
  Serial.print(h);
  Serial.print(" %\t");
  Serial.print("Temperature: ");
  Serial.print(t);
  Serial.println(" *C "); //Weep the readings on the screen
}
After loading the sketch and connecting the sensor, you can see the measurement results in the port monitor window. This is where the temperature and humidity values will be displayed. If something went wrong, check if the sensor is connected correctly, if the port number on the Arduino board and in the sketch match, if the contacts are secure.
If everything works and the sensor gives readings, you can do some experiments. For example, put the sensor in a colder place or breathe on it and monitor the changes. If the humidity level increases when you mist up, then the sensor is working properly. Blow on it with a thin stream – the humidity will decrease, and the temperature will return to normal.
At this point, you will be able to notice the difference between the real temperature value and the Arduino sensor reading. The accuracy of the DHT11 is much worse than the accuracy of the DHT22, as we have already mentioned in this article. If you have both sensors, connect them to the Arduino board and compare the results. In my experience, the average discrepancy is more than a degree. Keep this in mind when using these sensors in your projects.
Connecting the DHT22 Sensor to the NodeMcu ESP8266 Module
Now let’s look at connecting the DHT22 sensor to the NodeMcu ESP8266 module. The wiring diagram is shown below.

There is a ready-made DHT library to read the DTH22 sensor data using the ESP8266. Note that this library is specifically for ESP8266. The library for Arduino is not suitable. The contents of the sketch are shown in the listing.
//connecting the DTH library
#include "DHT.h"
// constants
#define DHTPIN 4 //connection pin (D2) of the DATA pin
#define DHTTYPE DHT22 // sensor DHT 22
#define INTERVAL_GET_DATA 2000 //measuring interval, ms
//creation of DHT object instance
DHT dht(DHTPIN, DHTTYPE);
//variable for the measuring interval
unsigned long millis_int1=0;

void setup() {
   Serial.begin(9600); // start the serial port
   dht.begin(); // start DHT
}

void loop() {
   if(millis()-millis_int1 >= INTERVAL_GET_DATA) {
      //receive data from DHT11
      int humidity = get_data_humidity();
      // output to the serial port monitor
      Serial.print("humidity= ");
      Serial.print("humidity= ";);
      // start interval counting
      millis_int1=millis();
   }
}

int get_data_humidity() {
   int h = dht.readHumidity();
   return h;
}
Conclusions
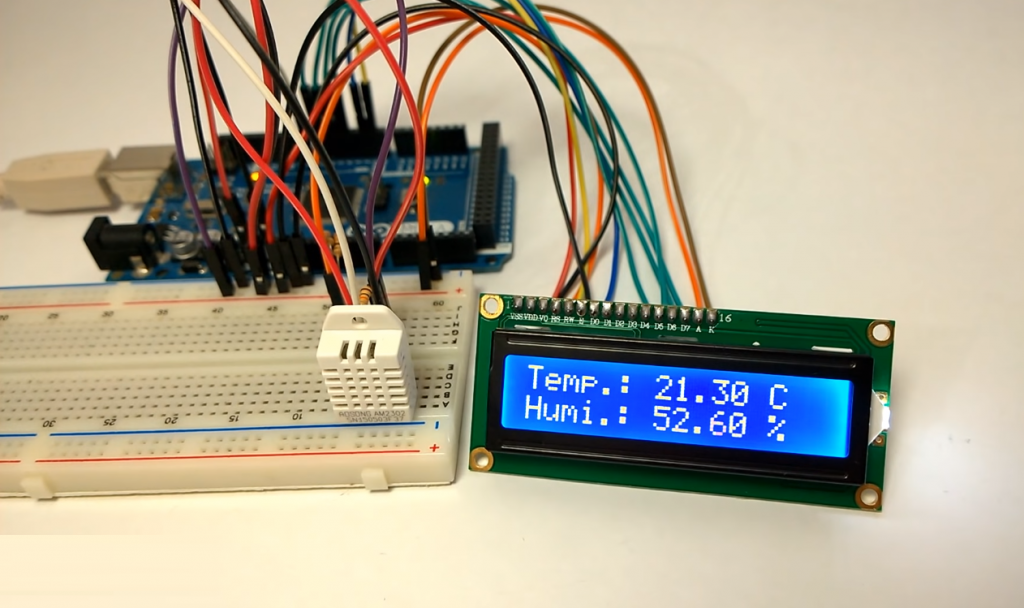
Let’s summarize. In this article, we discussed how to connect the Arduino temperature and humidity sensors DHT11 and DHT22 to the Arduino Uno board. It is better to buy the sensors as ready-made modules. To work with the sensors, you can use the DHT library for Arduino, which is easy to download from the link mentioned in the article. In the sketch, we simply initialize the object to work with the sensor and use its methods to get the temperature and humidity. We can see all the results we get in the port monitor window, save and display them on the LCD screen, send them via Bluetooth or the Internet.
Using DHT11 or DHT22 in Arduino projects, it is possible to build elements of smart home systems and smart greenhouses. With these sensors’ help, it is possible to create research complexes for climate measurements and environmental monitoring. The options for the sensors’ applications are almost inexhaustible. You can find many examples on the Internet, including on this site. Hopefully, with our article’s help, you won’t have any problems with connecting DHT11 and DHT22 to an Arduino.


