Arduino sketches no longer have dozens but hundreds of lines. The number of variables does not fit on one screen, and the lack of a debugger sometimes leads to nervous exhaustion. And in the end, the final decision was made to migrate from the Arduino IDE to something more development-friendly. My choice fell almost immediately on PlatformIO IDE, and I switched to it only on the second attempt. The first one was unsuccessful. After messing around with PlatformIO for a few hours, I came to the conclusion that everything is much easier and faster in Arduino IDE. But then, after a few months, I found a few more hours of my precious time to still understand PlatformIO IDE and try to understand it, and then completely switch to this integrated system. As an alternative, I considered Atmel Studio 7. But first things first.
What is Arduino?
In most people’s minds, Arduino is something for do-it-yourselfers who can’t write a program in binary code and who can’t build a bridge rectifier circuit blindly. This is partly true. Arduino, as an ecosystem, has made the world of electronics accessible even to the average person. But professionals can get a very good benefit from using the ecosystem, too. There is a myriad of different boards, sensors, sensors, libraries, and everything else that can significantly reduce the time from idea to implementation. Without Arduino, you can’t go anywhere if you need to build a single device or prototype in a limited series. That’s because you can connect the individual elements, quickly compose the code, and the device is ready. Often you spend more time assembling the case than developing the device itself.
Arduino is also a framework. A software component that facilitates the interaction between the program written by the programmer and the underlying hardware. The “language” Arduino created makes it much easier to write programs in the Arduino ecosystem, especially if they are written constantly for different devices and from time to time. As a framework, Arduino allows you to partially abstract away from the hardware and focus on implementable functions rather than searching for a microcode from a specific microcontroller.
 Do you want to become a master in Arduino? Purchase this book now!
Some popular topics:
This is roughly what the mundane C Blink looks like for compiling the AVR ToolChain (the toolchain is a set of utilities, libraries, and a complete set of compilers, respectively AVR ToolChain is a set for the AVR platform).
#define F_CPU 1000000UL
#include <avr/io.h
#include <util/delay.h>.
int main ()
{
    DDRB |= (1 << PB0);
    while(1)
    {
        PORTB ^= (1 << PB0);
        _delay_ms(1000);
        _delay_ms(1000);
        _delay_ms(1000);
        _delay_ms(1000);
        _delay_ms(1000);
        _delay_ms(1000);
        _delay_ms(1000);
    }
}
It’s a little weird, but we can still live with it. And the next example of the “blinker” is already in assembler (although the example doesn’t work, but never mind):
LDI R16,0x20
OUT DDRB,R16
LDI R17,0x00
OUT PORTB,R17
LDI R18,0x0D
STS TCCR1B,R18
STS TCNT1H,R17
STS TCNT1L,R17
LDI R20,0xF4
LDI R21,0x23
STS OCR1AH,R20
STS OCR1AL,R21
BEGIN1: IN R17,TIFR1
        CPI R17,2
        BRNE BEGIN1
        SBI TIFR1,OCF1A
        LDI R17,0x20
        OUT PORTB,R17
BEGIN2: IN R17,TIFR1
        CPI R17,2
        BRNE BEGIN2
        SBI TIFR1,OCF1A
        NOP;
        LDI R17,0x00
        OUT PORTB,R17
        RJMP BEGIN1
The following code snippet is taken from the Atmel Studio 7 examples. The ASF framework is used here as well as the Arduino one making development easier, in this case for AVR Microchip microcontrollers (former Atmel):
#include <asf.h>
/**
 \brief Example 1 main application routine
 */
int main( void )
{
    /* The 4 PWM config structs */
    struct pwm_config pwm_cfg[4];
    /* Initialize sysclock */;
    sysclk_init();
    /* Set up all 4 PWM channels with 500 Hz frequency. We want to use TCE0
       since this is where our LEDs are connected (PE0-PE3) */
    pwm_init(&pwm_cfg[0], PWM_TCE0, PWM_CH_A, 500); /* LED0 / PE0 */
    pwm_init(&pwm_cfg[1], PWM_TCE0, PWM_CH_B, 500); /* LED1 / PE1 */
    pwm_init(&pwm_cfg[2], PWM_TCE0, PWM_CH_C, 500); /* LED2 / PE2 */
    pwm_init(&pwm_cfg[3], PWM_TCE0, PWM_CH_D, 500); /* LED3 / PE3 */
    /* Start all 4 PWM channels with different duty cycles
      (which means different LED intensity).
      Since the LEDs are active low, 0% duty cycle means constantly lit */
    pwm_start(&pwm_cfg[0], 97);
    pwm_start(&pwm_cfg[1], 85);
    pwm_start(&pwm_cfg[2], 60);
    pwm_start(&pwm_cfg[3], 0);
    while(1) {
        /* Nothing to do */
    }
}
In the example above, the different degrees of the luminosity of the four LEDs are set. And finally, Arduino’s favorite Blink:
int led = 9; // the PWM pin the LED is attached to
int brightness = 0; // how bright the LED is
int fadeAmount = 5; // how many points to fade the LED by
// the setup routine runs once when you press reset:
void setup() {
  // declare pin 9 to be an output:
  pinMode(led, OUTPUT);
}
// the loop routine runs over and over again forever:
void loop() {
  // set the brightness of pin 9:
  analogWrite(led, brightness);
  // change the brightness for next time through the loop:
  brightness = brightness + fadeAmount;
  // reverse the direction of the fading at the ends of the fade:
  if (brightness <= 0 || brightness >= 255) {
    fadeAmount = -fadeAmount;
  }
  // wait for 30 milliseconds to see the dimming effect
  delay(30);
}
In this example, we see the LED dimming effect. Now imagine that you need to develop a complex firmware with lots of calculations, the external device, and active ports on the microcontroller. The simpler and clearer the code is, the easier it is to complete the task and do any modifications in the future. And believe me, even after six months, if you go back to any code, in the case of assembler, it will be easier to rewrite everything again than to try to understand the macaroni of your own code.
And what if the same code has to run on more than one microcontroller? And what if it must work with different architectures too? Of course, in most cases, assembly language code will be smaller and faster than Arduino or ASF framework based code. But life is such that the developer’s labor is much more expensive than the “iron” he works with. There are exceptions to this, of course. Develop a device, which will be produced in millions of copies, then yes. The economy on the code and, as a consequence, on the hardware can give significant savings, but it may not, if you mean the subsequent support of the device.
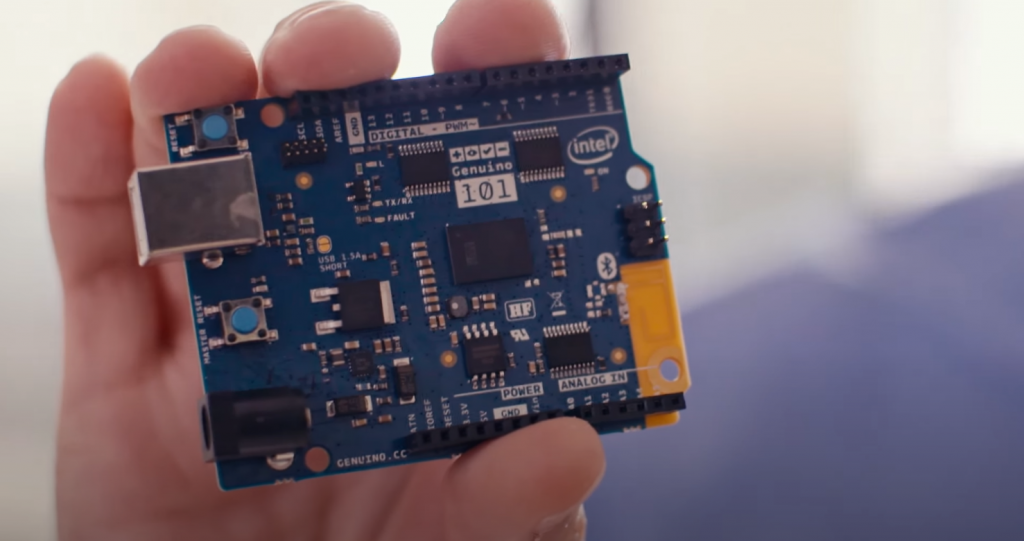
We already understood that Arduino is an ecosystem, a framework, but what else? Arduino is also an Integrated Development Environment (IDE). This is a software product where you can write, compile, and DDE (in this case, flash into the microcontroller) the firmware without having to leave it and without being distracted by other programs and utilities. In my articles, I have already mentioned many times that the Arduino IDE is very easy to learn and work with. It has no huge amount of functions that you can drown in. It is as simple as a Kalashnikov assault rifle and works almost flawlessly. What’s more, the Arduino IDE is extensible. Not only the Arduino boards based on AVR microcontrollers can be programmed in it, but many other boards as well. All you need to do is install the appropriate ToolChain and Framework. As a rule, the procedure is easy and uncomplicated through the BoardsManager. Thanks to it, you can freely program SAM (Cortex) based microcontrollers, ESP32, ESP8266, numerous Intel processor-based systems for IoT, and many others in Arduino IDE.
But that’s not all. If you don’t like the Arduino framework, you can install a different Arduino IDE framework. Just recently, I found out that you can use, for example, MiniCore, MightyCore, and other variations from MCUDude. These frameworks extend the use of AVR microcontrollers and still remain compatible with the standard Arduino. It is possible that there are other implementations as well. The author just hasn’t studied the issue in depth. Although… Do you want to use a real-time multitasking system when programming a microcontroller from under the Arduino IDE? You already have such a feature right now. It’s called Simba and works with AVR, SAM, and ESP32.
Another advantage of the Arduino IDE is the ability to split a single file into separate parts. Suppose your sketch is too big, and you get confused with it. You can, of course, go the standard way, create a new file with the source code, create a header file, and connect it via the include directive. But it’s much more comfortable, for smaller projects, to just split one big file into several smaller ones, right in the Arduino IDE and without any header files. It’s a beauty. And in the Arduino IDE, you can also use an external editor to edit code. For example, Visual Studio Code, Atom, or Notepad++. Only the moment you want to use an external editor, you should think about switching to another development environment with more convenience for the programmer.
So, about the drawbacks of the Arduino IDE. One of my projects had grown so large that, for unknown to me, for some absolutely mystical reasons, the code was compiled every third time. I didn’t make any changes, though. A trifle, but unpleasant to the point of tingling under my fingernails. What would happen if the code suddenly stopped compiling altogether, even though it was perfect 10 minutes ago, and no changes had been made since then?
The Arduino IDE has absolutely no versioning (and version control) and no way to work with it directly from the environment. I worked out in the most primitive way. When I needed to start a new version, I just did “Save as …” and change the sketch’s name, updating the version in the name, and everything more or less worked. Advanced developers will say that they could use an external system. Still, I wanted to work from an integrated environment and not to perform a bunch of manipulations after the finalization of the next version. For small and simple projects, you can do without the version control system, but if you do something a little larger, then it is more expensive not to use the tried and tested by years and bodies of programmers practices.
What else? The Arduino IDE completely lacks any kind of debugger. The only debugging tool for the code is the usual Serial.print, which is put in the places that explain the program execution’s logic. It is simply impossible to work with a serious project without a debugger. Even more so, that the higher models of microcontrollers support debugging right in the chip, stopping the execution and providing all the service information. The search for errors with the debugger is much faster, and fewer precious calories of brain activity are spent. At this point, I would like to insert three kopecks about Atmel Studio 7. Yes, this IDE does have a debugger and supports on-chip debugging through dedicated tools. The Atmel Studio also includes microcontroller emulation where you can debug without having a physical microcontroller, but the emulator doesn’t have peripherals, and as a rule, errors are found in buttons processing, sensor signals, and other data streams. But let’s move on.
A long time ago, when computers were big, programmers wrote code on punched cards, then terminals appeared, and code started to be typed on the keyboard. Since then, computers have changed. My cell phone is a million times smaller and a million times more powerful than the most powerful computer forty years ago. And people still write programs with only ten fingers (although some unique people can write code with fewer fingers, let’s not talk about them). Repeated attempts to use visual programming or programming without programming are still attempts. The paradigm of simplified algorithmic programming has not found wide application. As forty years ago, we are still entering program letter by letter, operand by variable, function by class. Little has changed in the developer’s work. Only minor improvements have appeared. But they are not present in the Arduino IDE. For example, I can’t find a variable declaration somewhere in the code and quickly understand what type it is (for that, I name variables by embedding type in the name, for example, ulSuperValue12 is of type Unsigned Long). I can’t immediately get a list of all object methods, or better yet, with their descriptions, I have no error prompts while I’m entering code. Other IDEs have it, but Arduino IDE has only formatting, yes, folding code. Once I spent hours trying to figure out why the same code worked with an ESP8266 and didn’t work correctly with an Atmega328P (pinout here). It was about the dimensions of two variables. In the esp8266 toolchain, all integer variables have a dimension of 4 bytes. The AVR toolchain uses 2 bytes for int and 4 bytes for long because of memory limitations. That’s why the rounding happens at compile-time, and then I wondered why the code looks ok but doesn’t work properly. Yes, such errors are the developer’s mistakes, but we are human beings to make them. In other IDEs, this would have been flagged in red right away, before compilation.
So we came to the point where Arduino IDE is great and indispensable for a beginner, but we need something more lively at a certain point.
What is PlatformIO?
Let’s start our introduction to PlatformIO with the text editor Visual Studio Code. Yes, VSCode is a text editor focused on programmers for writing source code in different languages and is awfully smart for that. VSCode is not just an editor, but nearly an integrated development environment. Almost and a little bit almost, because VSCode uses a mechanism of extensions, and its feature set can grow almost to infinity. Want to write in C? Just install the C extension and go with your songs and card games. Write code, compile it, all without leaving VSCode.
VSCode is very actively developed by Microsoft and has a huge community. VSCode desperately competes with another text editor for programmers, Atom. Atom has almost the same set of features as VSCode. It supports extensions, Git and GitHub integration, theme changes, auto-add, and all the features that VSCode has. And when choosing which editor to work with PlatformIO, the user is usually stumped because both have phenomenal capabilities. Here’s just what to choose? If you do not rely on the opinion of others, you should try both Atom and VSCode. If you read the reviews, VSCode has a slight edge in votes. For me, it was the support of Microsoft, the software giant, and a wider community that tipped the scales in favor of VSCode.
By the way, PlatformIO works both with VSCode and Atom (PlatformIO works with 14 editors, offline and cloud). However, we should make a small digression and explain what PlatformIO itself consists of.
In fact, PlatformIO is a set of components, the main of which is the PlatfromIO Core. The component responsible for compiling, upgrading, and installing libraries is in the Core nest all the toolchains and frameworks. To fully work with PlatformIO, you only need the Core component. You can write code in Notepad or FAR and work exclusively from the command line. Why not?
The next component, especially if you want more comfort, PlatformIO IDE. That “integrated development environment”, which all are so praised. But to be honest, in the same VSCode PlatformIO IDE looks like an addition to the status bar, point in the drop-down menu, but the title page with access to all the basic functions like installing a new library or selecting a specific board, for which the code is developed.
Yet, there are components for debugging, remote device management (firmware, debugging, etc.), and unit testing. Debugging is a very useful thing, but currently, PlatformIO does not support every board, and in-chip debugging requires special equipment.
Pros and Cons of PlatformIO and VSCode
Let’s start with all the conveniences that VSCode offers to the developer. I won’t mention the possibility of changing themes, fonts, and stuff like that. The theme can be changed in the Arduino IDE and the font too. But the speed is amazing. VSCode works ten times faster than Arduino IDE, if not less. From startup to compilation. The system is so responsive that it’s a pleasure to work with.
VSCode has everything you could dream of for programmer convenience, and what you don’t have, you can install as a plugin.
When working with a large and long file, there is a problem related to navigation through the code. It is not always possible to find the desired section quickly. In VSCode, the problem is solved in several ways. There is a general overview of the whole file. Combined with text highlighting, you can very quickly jump over the thumbnail to the right place. For example, I need to #define definitions. I know they go somewhere in the beginning. On the thumbnail, they are purple. Clicked there, and oops, already in the right place. Or you can go to the variable description or select it (or any function or class) in the list of all functions and variables.
In general, working with text in VSCode is a real pleasure. I need to try writing fiction in it sometime. What if it turns out to be much more convenient than Scrivener or Word? In VSCode, you can open multiple files at once. You can close them if you want, move them around, open multiple file panels, open multiple tabs of a file and so on and so forth. Search works just as well. When you look for a structure, it is highlighted in the thumbnail. I won’t go into details about the code collapsing; it’s available even in the Arduino IDE.
Useful is also the ability to refactoring, but it does not work the same for all platforms. The set of features differs. But to rename a variable in one fell swoop in the entire text is difficult to underestimate.
Particularly worth canceling is IntelliSense. The same gimmick that Arduino IDE users can only dream of. IntelliSense highlights potential errors in the code the moment you make them. The system gives you a more detailed description of compilation errors. Hover over the underlined and get advice on what you can do about it. And having autocomplete makes my day every time I sit down and unpack VSCode with PlatformIO installed. You start writing code, and the system itself tells you which functions can start with what you’ve written or which methods and fields the entered structure has. Incredibly convenient. And for particularly advanced keyboard workers, there is an outlet in the form of various kinds of shortcodes. Suppose you are writing a very monotonous code, which has a lot of repetitive elements. So, to not enter them every time by hand, you can use shortcodes, which will automatically unfold in a predetermined structure. In general, it is impossible to count all the delicious and useful things.
But such an increased hipness has its own, quite obvious disadvantages. The system allows you to install hundreds of improvements, dozens of languages, and many dialects. With this kind of vinaigrette, something starts to go wrong. The simplest example. In addition to PlatformIO, the system has an Arduino add-on (released by Microsoft). The add-on has almost the same functionality as the original IDE, but there are occasional collisions with PlatfromIO. Therefore, I recommend, if you have started to work with PlatformIO, then do not connect the add-on with Arduino. For this, we have native software. Or when you connect libraries and new classes. IntelliSense picks them up slowly, and you have to reload VSCode or rebuild the VSCode indexes by hand. Thankfully this feature is present and can be done only by pressing one menu item (the operation can be called, for example, through Run Task or through PlatformIO menu).
However, in spite of all these difficulties, the system is not just easy to use, but pleasant. All you have to do is to understand it. Let’s move on.
PlatformIO + VSCode Project Structure and What is Workspace
After Arduino IDE or other integrated development environments, it’s not so easy to just get a handle on the piles of menus and folders in PlatformIO IDE based on VSCode. It takes some time to start understanding how it all works together.
Let’s start with the folder structure of our PlatformIO and VSCode combination. By default, the structure that VSCode works with is the project. A single project is placed in a separate folder with subdirectories. VSCode, as an editor, can work with a single file or with a larger Workspace structure, but more about that below. The folder contains the following subfolders; I will explain right away what is there and how:
- .git – a hidden folder with Git service files, if the project folder is connected to the appropriate version control system.
- .pio – all the magic of PlatformIO is stored here. This is where the source code is compiled, the project libraries installed through the PlatformIO library manager are placed here; the compiled libraries are stored here for future linking. In general, this folder should be visited only for the final result. If you compile a project for several boards/platforms at once, a separate directory will be created for each of them. The Clean procedure in the PlatformIO compilation block will clear this folder, and the next time you compile, it will be slower due to recompiling everything. This feature of having pre-compiled libraries is the increased compilation speed in PlatformIO.
- .vscode – service folder of VSCode, here are stored settings of the VSCode itself in the context of the project, as well as the database for services such as IntelliSense (prompt the code, catching bugs, and the like).
- boards – if you only use OEM boards for programming in PlatformIO, then this folder is not in the list.
- include – a folder for storing header files if you work in C/C++. PlatformIO, unlike Arduino IDE, can not just take and divide the source code file into several smaller ones, which are easier to work with. Separating individual blocks of code is only possible by specifying a subsequent include directive and creating a header file with a .h extension. However, I store header files in the src folder, and I don’t know why.
- lib is the folder for the project’s private libraries. Some users, myself included, are perplexed why when installing a library via Library Manager, they end up in .pio, not in the global context, but in the context of a specific project. PlatformIO creators’ logic is as follows: all standard libraries are installed via Library Manager, all standard libraries are updated, if the user needs a library in lib, he installs it manually in this folder. Everything.
- src is the folder for storing our source code. The place where we add, including new files. The default file is main.cpp.
- test – a special folder for the modular testing of the source code. You can read more about it in PlatformIO documentation.
In addition to folders, you should also pay attention to several files that are usually located at the root of your project:
- .gitignore – a file with a simple listing of directories and files that should not be synchronized with Git. This is where VSCode settings are made on the local machine, the entire .pio directory and a lot more can be added.
- .travis.yml – this file is a configuration file Travis, which helps in synchronizing the source code, including with GitHub. See documentation for details.
- platformio.ini – this is probably the most interesting of the PlatformIO IDE root files. This file allows you to change the IDE configuration, including the libraries, boards, frameworks, and everything else you use, specifically for the project. I recommend that you study the structure and predicates of this file first.
All of the above referred to project-folders. But at a certain point in time, the developer discovers that somehow miraculously, instead of a project folder, he has an incomprehensible workspace (Workspace). The availability and functions of Workspace are nowhere clearly and distinctly explained. The Microsoft documentation is so unclear that even after reading it three times, I still don’t have a clear understanding of what Workspace is and why I need it. I will try to give my explanation of what it is and why we need it.
I will start by saying that you can only open one project folder in one instance of VSCode. If you try to open another folder, the current project will close, and a new folder will open. If you suddenly have an overwhelming desire to work with two project folders at once, you can run VSCode again and open the desired project there. Or you can do something more cunning.
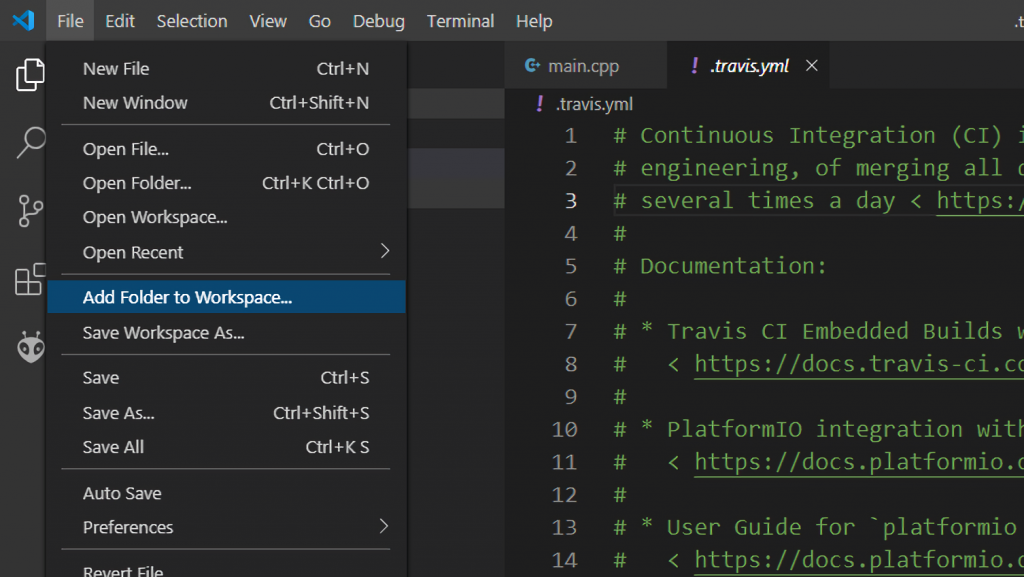
When a project is already open, go to the File menu and call the Add Folder to Workspace submenu. This automatically creates a workspace with two project folders. And you can edit files in both of them. In this way, you can add more projects to the workspace. Then, save the entire workspace (in fact, a single file is saved, when you open it later, this very workspace will open). I have not found any other way to create workspaces.
So why do we need workspaces? When you work with large sets of projects, it makes sense to group them and open them together when you have several sets. Moreover, you can use specific VSCode settings in the workspace. For example, one group of projects would use a gray color scheme, while another would use black and a smaller font.
Deleting project folders from the workspace is painless; they are only deleted in the workspace and remain physically on the disk. It is important not to mix up and delete the folder inside the project and not delete the workspace’s project folder.
Adding Your Board to the Project (At Least Two Ways)
If you suddenly feel the need to add your circuit board to PlatformIO, there are two ways to pull this off. The most reliable and potentially the least problems – add the board to the boards’ folder of the project. In this case, the board will be synchronized with a specific project, and there is no risk that it will be used in another project, where it should not or when synchronizing over the Internet on a new PC, there will be no description of the board.
{
    { "build": {
      { "core": "arduino",
      { "extra_flags": "-DARDUINO_AVR_ATmega328P",
      { "f_cpu": "8000000L",
      "mcu": "atmega328p",
      { "variant": "standard"
    },
    }, "frameworks": [
      { "arduino",
      "simba"
    ],
    { "fuses": {
        { "efuse": "0xFD",
        "hfuse": "0xD0",
        "lfuse": "0xD2",
        "lock": "0x0F"
      },
    "name": "ATmega328P BB 8Mhz",
    { "upload": {
      "maximum_ram_size": 2048,
      { "maximum_size": 32256,
      { "protocol": { "stk500v2",
      "require_upload_port": true,
      "speed": 57600,
      { "flags": "-v -e"
    },
    { "url": "https://blog.kvv213.com",
    }, "vendor": "kvv213"
  }
Above I described my favorite Atmega328P without any wrapper. Choose the name of the file according to the block “name”, in my case, it is ATmega328P BB 8Mhz.json.
In the description, we specify settings like processor frequency, compilation options, flags for the toolchain compiler, protocols used, and flags for the firmware utility, and so on.
If you need to modify an existing board, you can make the necessary changes via platfromio.ini instead of creating a new one:
[platformio]
default_envs = ATmega328P BB 8Mhz
[env:d1_mini]
platform = espressif8266
board = d1_mini
framework = arduino
upload_port = COM3
monitor_speed = 19200
lib_deps =
    1106
[env:ATmega328P]
platform = atmelavr
board = ATmega328P
framework = arduino
upload_port = COM3
upload_protocol = stk500v2
upload_flags =
    -v
    -e
lib_deps =
    1106
[env:ATmega328P BB 8Mhz]
platform = atmelavr
board = ATmega328P BB 8Mhz
framework = arduino
monitor_port = COM5
upload_port = COM3
upload_protocol = stk500v2
upload_flags =
    -v
    -e
lib_deps =
    1106
In this example for the Atmega328P, there are two ways to compile the firmware (standard ATmega328P and the ATmega328P BB 8MHz that I created), with the connection of a library with the identifier 1106 and special flags for the firmware loader.
The second way is not so far away from the first one, but the board is added globally (on your PC, of course). You create exactly the same file and put it in the folder of the corresponding PlatformIO hardware platform. For AVR it would be somewhere here .platformio\platforms\atmelavr\boards\. By the way, there you can also look at examples of how to fill the board files.
Loading with Non-Arduino Loaders
At first, it may seem that PlatformIO can only work with Arduino boards. But this is far from it. PlatfromIO, thanks to the developers and numerous community’s efforts, can work with hundreds of boards and flash most of them directly without leaving the environment.
In the previous paragraph, I explained how you could add your board for compilation. There is also how to flash it. Alternatively, you can specify the same conditions in the platformio.ini project configuration file.
Let’s take the same trivial Atmega328P as an example. There are at least three important blocks in the board description file:
1. A description of the “hardware” of the board.
"build": {
      "core": "arduino",
      "extra_flags": "-DARDUINO_AVR_ATmega328P",
      { "f_cpu": "8000000L",
      "mcu": "atmega328p",
      { "variant": "standard"
    },
As you see in this block, we write the additional flags for compilation, the frequency of the processor (in this case, it’s 8 MHz because the chip works without an external oscillator), the type of microcontroller, and other specific parameters of the particular toolchain (here it’s AVR).
"build": {
  "core": "esp8266",
  "extra_flags": "-DESP8266 -DARDUINO_ARCH_ESP8266 -DARDUINO_ESP8266_WEMOS_D1MINI",
  "f_cpu": "80000000L",
  "f_flash": "40000000L",
  "flash_mode": "dio",
  { "ldscript": "eagle.flash.4m1m.ld",
  "mcu": "esp8266",
  { "variant": "d1_mini"
},
The code above shows a building block from the WeMos D1 R2 mini. Different toolchain, different parameters. This immediately suggests a conclusion about where to look for information on all these flags – in the description of the toolchain, where else. You need to get to the platforms folder in .platformio. That’s where all the toolchains are installed.
2. Specific microcontroller hardware setup.
{ "fuses": {
    "efuse": "0xFD",
    "hfuse": "0xD0",
    "lfuse": "0xD2",
    "lock": "0x0F"
  },
PlatrofmIO can’t flash fuses and loaders yet, but the situation may change soon. For this purpose, you can prescribe specific “fuses” for a particular microcontroller beforehand. The fuses’ exact value on those MCUs, where such operation can be done, must be obtained from the official specifications. The Atmega328P is configured to work without a chip and with a working Reset input in the above example. By the way, WeMos don’t have such a thing. Everything is flashed through the bootloader.
3. Specifics of the bootloader.
"upload": {
  "maximum_ram_size": 2048,
  { "maximum_size": 32256,
  { "protocol": { "stk500v2",
  "require_upload_port": true,
  "speed": 57600,
  { "flags": "-v -e"
},
In this block, you write the specific instructions on how and with what to flash. Accordingly, for the Atmega328P, you specify the maximum values for the code size and the RAM, you specify the speed at which you want to flash (the MCU without external quartz sews at a reduced speed), you specify the specific firmware protocol. In my case, it is stk500v2 because I use a programmer which works with this protocol.
"upload": {
  "maximum_ram_size": 81920,
  "maximum_size": 4194304,
  { "require_upload_port": true,
  { "resetmethod": "nodemcu",
  "speed": 115200
},
WeMos has other parameters, so there is no protocol, they have the same protocol, but the reset method of the device is specified. You can see which protocols are used in PlatformIO documentation. For the AVR, you can also see what protocols avrdude supports (for the AVR, you can do everything just via it).
This way, you have huge flexibility. It is not as fast to configure as in the original Arduino IDE, but once you understand and feel all the available controls, it will be hard to go back to the classic development environment from Italy.
Using Git and GitHub
Visual Studio Code already has built-in support for Git (distributed version control system). Why? Perhaps because one of the most popular repository services, GitHub, was recently purchased by Microsoft. The Redmond giant has been behaving quite oddly lately. After inventing the community-version of its Visual Studio integrated development environment, note the free version, it allowed creating private repositories on GitHub for free. So what’s next? Free versions of Windows and Office?
But back to Git and GitHub. Git support is already built into Visual Studio Code and can be used if you have Git installed on your system and a project is attached to the repository. When you create a new project on GitHub, a simple instruction is given what you need to do, and you can connect an existing project to the local folder by the following simple instruction. However, you can connect the repository directly from the PlatformIO menu. Whichever way suits you best.
Millions of users probably use git and GitHub. And if you get in trouble, you can get help and support almost immediately. And with as many private repositories as you want, and for free, you can do as much code craft as you like.
So, to start using Git and GitHub, you need to download the Git version for your operating system, plug in your project, and start using the Source Control tab. Git control is simple and centered on the bottom status bar. You can select the current branch of the source code to see how many changes need to be integrated into the repository. That is all. Information about individual changes is displayed in the Source Control tab.
In addition to GitHub, you can use any other repository under Git. You can even install an extension for VSCode and use, for example, SVN or Azure DevOps as your version control system. The choice is pretty much up to you.
Conclusion
Alas and ah, the time of the Arduino IDE is irrevocably over for me. The few years we spent together will stay in my memory until the very last day. The simple system was replaced by the real monster PlatformIO together with the even more monstrous VSCode.